Redux
1. The Single Immutable State Tree (Principal #1)
Video: https://egghead.io/lessons/javascript-redux-the-single-immutable-state-tree
The first principal to learn in Redux is that you are going to represent your whole application ("State") as a single JavaScript Object. All changes and mutations to the state in Redux are explicit so it is possible to keep track of all of them.
In this video Dan shows how the state of a Todo app changes over time as data is added and filters applied; its a glimpse of power of the single state tree.
\
2. Describing State Changes with Actions (Principal #2)
Video: https://egghead.io/lessons/javascript-redux-describing-state-changes-with-actions
The second principal of Redux is that the state tree is read-only; you cannot modify or write to it, instead, any time you want to change the state you need to dispatch an action. (i.e. you can only "update" the state using a function...) An action is a plain Javascript Object describing the change. Just like the state is the minimal representation of data in your app, the action is the minimal representation of the change to that data. The only requirement of an action is that it has a type property (this more a description for your action). The convention is to use a String because they are serializable (i.e. easy to JSON.stringify)
"Any data that gets into your Redux Application gets there by actions"
\
3. _Pure** and **Impure_** Functions**
Video: https://egghead.io/lessons/javascript-redux-pure-and-impure-functions
Pure functions depend solely on the values of the arguments. Pure functions do not have any (observable) side-effects such as network or database calls. Pure functions just calculate the new value [of the state].
The functions you write in redux need to be pure.
4. The Reducer Function (Principal #3)
Video: https://egghead.io/lessons/javascript-redux-the-reducer-function
The UI/View layer of an application is most predictable when it is described as a pure function of the application state. Pioneered by React Ractive and now adopted by several other frameworks, Redux compliments this approach with another idea: the state mutations in your app need to be described as a pure function that takes the previous state and the action being "dispatched" (performed) and returns the next state of your app.
Inside any Redux app there is one function that takes the state of the whole application and the action being dispatched and returns the next state of the whole application. It is important that it does not modify the state given to it; it has to be pure, so it has to return a new Object Even in large applications there is still just a simple function that manages how the next state is calculated based on the previous state of the whole application and the action being dispatched. It does not have to be slow, for example: if I change the visibility filter I have to create the new object for the whole state, but I can keep the reference to the previous version of the Todo's array because the list of todos has not changed when we change the visibility filter; this is what makes Redux fast.
this is the 3rd and final principal of Redux: to describe state changes you have to write a function that takes the previous state of the app and the action being dispatched and returns the next state. The function has to be pure and is called the "Reducer".
\
5. Writing a Counter Reducer with Tests
This video walks through creating a basic counter in Redux.
Video: https://egghead.io/lessons/javascript-redux-writing-a-counter-reducer-with-tests
The first [and only] function in this video is the Reducer for the counter example. A reducer accepts state and action as arguments and returns the next state.
Before writing any code, we write a few assertions (tests) using Michael Jackson's (Yes, there's a developer with that name... and he's really good) Expect (testing/assertion) library: https://github.com/mjackson/expect
We assert that when the state of the counter is zero and you pass an INCREMENT action, it should return 1.
And similarly when the counter is 1 and we INCREMENT it should return 2.
If we run these tests [in the browser], they will fail because we have not even begun to implement the reducer. We are going to start by checking the action type. If the action type is INCREMENT we are going to return state + 1 (state plus one) If the type is DECREMENT we are going to return state - 1 (state minus one)
If you run the tests, you will find that that this is enough to get them to pass.
Code for Video 5 @ 1:15
However, there are still some flaws in our implementation of the counter reducer. If we dispatch an action that it [the reducer] does not understand, it should return the current state of the application.
However if we check for that, we will see that this test fails because we currently don't handle unknown actions. So I'm going to add an else clause that returns the current state and the tests pass now.
And the tests pass now.
Code for Video 5 @ 1:49
Another issue is that while the reducer is in control of the application state, currently it does not specify the initial state; in the case of the counter example that would be zero.
The convention in Redux is that if the reducer receives undefined as the state argument, it must return what it considers to be the initial state of the application. In this case it will be zero.
Code for Video 5 @ 2:15
"Now come a few cosmetic tweaks" ... At the end of the video Dan replaces the if/else blocks with a switch statement* - which we agree is neater (and works in all browsers)
However Dan also makes a couple of changes which are not just "cosmetic": changing the reducer function to be an ES6 Arrow Function and also includes an ES6 default parameter syntax to specify what the state should be if its undefined.
The reducer function written in ES5 (Works in ALL Browsers):
is re-written using ES6 features: (Only Chrome fully-supports both these new features)
Arrow functions can be fewer characters to type but are not supported in Safari or Internet Explorer [at the time of writing] ... 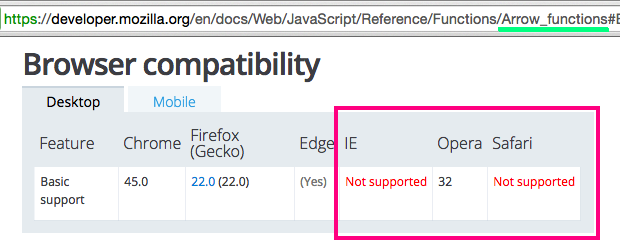
Default parameters are a nice addition to JavaScript (ECMAScript 2015) because they make it clear what the default value of the parameter should be if its unset, however they are not supported in Internet Explorer, Safari or Opera [at the time of writing] ... 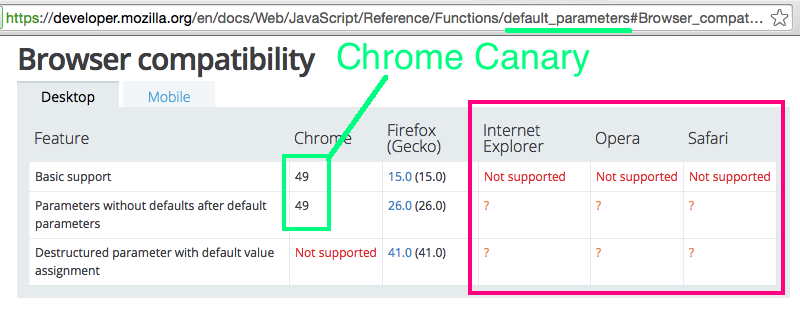
These browsers still account for between 30%-50% of people using the internet in December 2015 (depending on the age/geography of the people using your app... see: https://en.wikipedia.org/wiki/Usage_share_of_web_browsers ) And considering that most people take ages to upgrade to the latest browser Microsoft Internet Explorer 8 still has 10% market share! and is still available to be downloaded.
using ES6 features has two implications:
If you want to run the code in a browser you need Google Chrome Canary.
And/Or, You need to "transpile" (convert) your code using Babel before running it in browsers.
We will come back to Babel later...
\
6. Store Methods: getState(), dispatch(), and subscribe()
Video: https://egghead.io/lessons/javascript-redux-store-methods-getstate-dispatch-and-subscribe Code: Video 6 Code Snapshot
Video #6 picks up from where #5 finished, so if you skipped video 5, go back and watch it, and try writing/running the code!
Dan starts off by showing how to include Redux (from CDN JS) in a client-side app so we can start using the methods. This is not the recommended way of loading Redux, but works fine for this example/demo.
"In real applications I suggest you use npm and a module bundler like webpack or browserify".
In this tutorial we are using a single function from Redux called createStore.
Using ES6 destructuring assignment syntax to extract the createStore method from Redux:
"The store binds together the 3 Principals of Redux, it holds the current application state object, it lets you dispatch actions. When you create it [the store] you need to specify the reducer that tells how to update the state with actions. In this example we are calling createStore with counter as the reducer that manages the state updates."
Redux Store has 3 (important) methods:
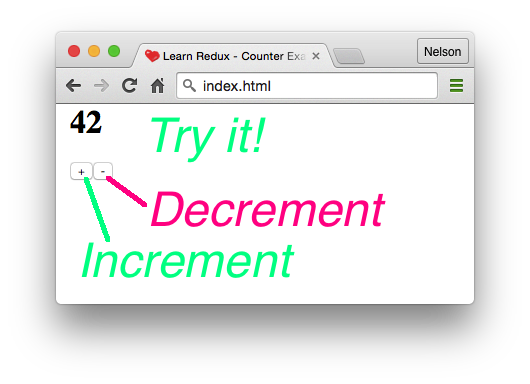
getState- retrieves the current state of the Redux store. In the case of our counter the initial state is Zero.dispatch- lets you dispatch actions to change the state of your application. if we log the state of the application after dispatching an action (e.g:INCREMENT), we see that the state has changed to 1. (the most commonly used method)subscribe- lets you register a callback that the Redux store will call any time an action has been dispatched. so you can update the UI of your application to reflect the current application state.
The code at the end of video #6 looks like this: (explanatory comments added)
Try viewing the index.html file in Chrome Canary
Download Chrome Canary: https://www.google.co.uk/chrome/browser/canary.html
7. Implementing Store from Scratch
Video: https://egghead.io/lessons/javascript-redux-implementing-store-from-scratch Code: Video #7 Code Snapshot
In the 7th Video Dan shows how the Redux store is implemented in 20 lines of code:
"Because the subscribe function can be called many times, we need to keep track of all the changed listeners. And any time it is called we want to push the new listener into the (listeners) array. Dispatching an action is the only way to change the internal state. in order to calculate the new state we call the reducer with the state and the action being dispatched. And after the state is updated we need to notify every change listener by calling it. 1:44 - There is an important missing piece here: we have not provided a way to unsubscribe a listener. But instead of adding a dedicated unsubscribe method, we will just return a function from the subscribe method that removes this listener from the listeners array. 2:03 - Finally by the time the store is returned we want it to have the initial state populated. so we are going to dispatch a dummy action just to get the reducer to return the initial value. 2:18 - this implementation of the Redux store is (apart from a few minor details and edge cases) is the createStore we ship with Redux."
Once you have watched the video, checkout the source code for Redux.createStore on Github: https://github.com/rackt/redux/blob/master/src/createStore.js
\
8. React Counter Example
Video: https://egghead.io/lessons/javascript-redux-react-counter-example
"In the simplest counter example I update the document.body manually any time the store state changes, but of course this approach does not scale to complex applications. So instead of manually updating the DOM I'm going to use React."
I'm adding two scripts to the <head> corresponding to React and React-DOM and a root div to render to:
These scripts are available on CDNJS: https://cdnjs.com/libraries/react/ You can opt to use
fb.meas your React CDN if you prefer.
So now I can call ReactDOM.render with my root component. The render function is called any time the store state changes, so I can safely pass the sate of the store as a prop to my root component.
Since the state is held inside the Redux Store the counter component can be a simple function which is a supported way of declaring components since React version 0.14.
Now I want to add increment and decrement buttons to the component, but I don't want to hard-code the Redux dependency into the component, so I just add onIncrement and onDecrement props as callbacks.
In my render method I pass the callbacks that call store.dispatch with appropriate actions. Now the application state is updated when I click the buttons.
by the end of Video 8 your code should look like this: index.html
Recap
[1:20] Now let's recap how this application works.
The counter component is what I call a "dumb component", it does not contain any business logic, it only specifies how the current application state transforms into renderable output and how the callback passed via props are bound to the event handlers.
When we render a counter we specify that its value should be taken from the Redux store current state. And when the user presses increment [button] or decrement [button] we dispatch the corresponding action to the Redux store.
Our reducer specifies how the next state is calculated based on the current state and the action being dispatched.
And finally we subscribe to the Redux store so our render function runs any time the state changes, so the counter [component] gets the current state.
Notes on using JSX Syntax in React in Browsers
Most React.js Examples are written using JSX syntax. This is not standard JavaScript so no browser can understand it.
If you want the Counter example to work in the browser (without having to compile your counter component with babel) you will need to include the JSXTransformer:
note: in-browser compilation of JSX is not recommended for "Production" use. instead you will need to compile your JSX to JS using Babel...
For more detail, read: https://facebook.github.io/react/docs/tooling-integration.html#jsx
Don't forget to add type="text/jsx" to your script tag in index.html to ensure that the JSX in the React Component is transformed. see: https://stackoverflow.com/questions/28100644/reactjs-uncaught-syntaxerror-unexpected-token
Final version of working code for Video 8:
index.htmlRun it by opening it in Google Chrome Canary:
9. Avoiding Array Mutations with concat(), slice(), and ...spread
In this video we learn how to avoid mutating arrays using concat(), slice(), and the ES6 array spread operator.
Video: https://egghead.io/lessons/javascript-redux-avoiding-array-mutations-with-concat-slice-and-spread
"In this lesson I use the expect library to make assertions and deep-freeze to make sure my code is free of mutations."
These are loaded from @Substack's CDN: https://wzrd.in
"Let's say that I want to implement a counter list application. I would need to write a few function that operate on its state and its state is an Array of JavaScript Numbers representing the individual counters."
The first function I want to write is called addCounter and all it should do is to append a zero at the end of the passed Array.
At first I use the Array.push() method to add an item at the end of the Array, and it works.
Snapshot of code for Video 9 @ 0:36
However we need to learn to avoid mutations in Redux and I'm enforcing this by calling deepFreeze on the original array. Now my attempt to .push does not work; it cannot add a new property to a "frozen" object. Instead of .push I'm going to use the concat method which does not modify the array.
Now the tests pass without mutations.
And I can also use the new ES6 spread operator to write the code in a more concise way:
Note: Again, (at the time of writing) You will need to be running Chrome or Firefox for this example to work because the spread operator is still not (yet) supported in all browsers ... even though it is a Standard ...
The next function is removeCounter and it accepts two arguments: list (an Array of Numbers) and index the Number to skip from the Array.
So if I've got three numbers and I'm passing 1 as the second argument, I expect to receive an Array with two items with the second item skipped in the Array:
Usually to delete an item from an Array I would use the splice method. However splice is a mutating method, so you can't use it in Redux. I'm going to deepFreeze the (listBefore) Array object, and now I need to figure out a different way of removing an item from the array without mutating it. I'm using a method called slice here and it does not have anything to do with splice; it is not mutating and it gives me a part of the Array from some beginning to some end index. So what I am doing is taking the parts before the index I want to skip and after the index I want to skip and I concat them to get a new array:
Finally, instead of writing it as a method chain with concat calls, I can use the ES6 spread operator to write it more concisely:
Note: make sure you understand how both of these work before proceeding ... Dan is a big fan of his ES6; he uses it everywhere!
Now that we have implemented adding and removing counters, lets implement incrementing the counter:
The incrementCounter function takes two arguments: list - the Array (of all our counters) and index - the counter that should be incremented. So the returned value (Array) has the same count of items but one of them is incremented.
Directly setting the value at the index works but this a mutation. so if we add a deepFreeze call its not going to work anymore.
So how do we replace a single value in the array without mutating it? it turns out the answer is really similar to how we remove an item.
We want to take a slice before the index and concat it with a single item Array with a new value and then concat it with the rest of the original Array.
Finally with the ES6 spread operator we can spread over the left part of the Array specify the new item, and then spread over the right part of the original Array and this looks much nicer ...
In this lesson you learned how to use the concat method or the spread operator and the slice method to add, remove and change items in arrays without mutating them and how to protect yourself from mutation with deepFreeze in your tests.
Code snapshot at the end of Video 9: [
index.html(https://github.com/nelsonic/learn-redux/blob/f25da6293c26b9262c888219139830979c51633b/index.html#L16-L67)
\
10. Avoiding Object Mutations with Object.assign() and ...spread
Video: https://egghead.io/lessons/javascript-redux-avoiding-object-mutations-with-object-assign-and-spread
Like in the previous example I use expect and deepFreeze libraries from NPM to make test assertions. And this time I'm testing a function called toggleTodo that takes a todo Object and flips its "completed" field. So if completed was false it should be true in the returned value or if it was true it should be false
Just like in the last lesson, I'm going to start by writing a mutating version that passes the current test. So a mutating version just flips the completed field and re-assigns it on the passed Object (*the todo):
And while it works, we know that mutations are not allowed in Redux. So to enforce this, I'm calling deepFreeze on my todo Object (in the case of the test todoBefore) and I'm not allowed to change its completed field anymore.
One way out of this would be to create a new object with every field copied from the original object except the completed field which would be flipped:
However if we later add new properties to the todo object, we might forget to update this piece of code to include them.
This is why I suggest that you use the ES6 Object.assign method which is new to ES6 and it lets you assign properties of several objects onto the target object. Note how the Object.assign order corresponds to that of the JavaScript assignment operator. The left (first) argument is the one who's properties are going to be assigned, so its going to be mutated. This is why we are passing an empty Object as the first argument so we don't mutate any existing data. Every further argument to Object.assign will be considered a "source" Object who's properties will be copied to the target object.
It is important that if several sources specify different values for the same property, the last one "wins". and this is what we use to overwrite the completed field despite what the original object says.
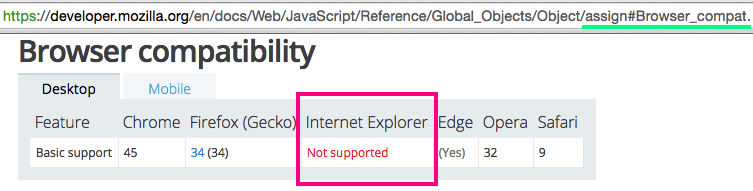
Finally you need to remember that Object.assign is a new method in ES6 so it is not natively available in all the Browsers (specifically not supported in Internet Explorer).
You should use a "polyfill" either the one that ships with Babel or a standalone polyfill to use it (Object.assign) without risking crashing your website.
Another option that does not require a polyfill is use the new Object spread operator which is not part of ES6 however it is proposed for ES7 it is "fairly popular" and it is enabled in Babel if you use the "stage 2 preset":
Code at the end of Video 10:
index.html
Note: we have not used the
Objectspread operator in our code because it does not run in any browser!!
\
11. Writing a Todo List Reducer (Adding a Todo)
Video: https://egghead.io/lessons/javascript-redux-writing-a-todo-list-reducer-adding-a-todo
Just like in the previous two lessons, I'm using the expect library to make test assertions and deep-freeze library to prevent accidental mutations in my code.
In this lesson I will create a reducer for a Todo-list application who's state is described as an array of Todos.
Just to remind you what a reducer is: its a "pure function" you write to implement the update logic of your application. That is how the next state is calculated given the current state and the action being dispatched.
Before writing a reducer I want a way of knowing whether its code is correct. So I'm starting by writing a test for it:
I'm declaring two variables:
stateBefore- the state before, which is an emptyArrayaction- the action being dispatched - which is an action describing a user adding a new todo with someidand atext(fields).
I am also declaring the state I expect after calling the reducer. and like stateBefore it is an Array, but this time it has a single element representing the Todo that was just added; so it has the same id and text as the action Object. and it also has an additional field called completed that I want to be initialized to be false
We want to make sure that the reducer is a "pure function", so I am calling deepFreeze both on the stateBefore and the action.
Finally I'm ready to use the expect library to verify that if I call the todo reducer with the stateBefore and the action I'm going to get the result that is deeply equal to the stateAfter I just declared.
This concludes my first test, now I can call it just like a regular JavaScript function: testAddTodo(); And if it doesn't throw in the expect call I'm going to see a message that the tests have passed.
Of course it fails because the reducer is not implemented yet; it's an empty function, so it returns undefined instead of the Array with a single item that I expect in the test.
To fix this I will need my reducer to take a look at the action.type property which is a String when it matches the ADD_TODO string which I specify in my test to satisfy the test I need to return a new Array which includes all the items from the original Array but also a new Todo item that has its id and text copied from the action Object and a completed field set to false
Finally I add a default case to my switch statement because every reducer has to return the current state for any unknown action:
Now the tests run successfully!
Lets recap the data flow in this example to see why first I create the state Array (stateBefore) which is an empty Array and the action Object inside my test function. I'm passing them as arguments to my reducer function called todos the todos reducer accepts the state and action as arguments and takes a look at the action.type in this case the action.type is a String saying ADD_TODO so it matches the switch case inside the reducer the reducer returns a new Array which contains the items from the old Array (in the case of our test, the empty stateBefore Array...) and a new item (Object) representing the added todo however the state we passed from the test was an empty Array so at the end we are going to get an Array with a single item which is the new todo finally we compare the returned value to an Array with a single todo item to make sure the reducer works as intended the equality check passes so this makes the test successful.
Code snapshot for the end of Video 11:
index.html
\
12. Writing a Todo List Reducer (Toggling a Todo)
This lesson picks up where we left off in Video 11, so make sure you watched that an tried writing/running the code!
Video: https://egghead.io/lessons/javascript-redux-writing-a-todo-list-reducer-toggling-a-todo
In this lesson we will continue creating the reducer for the todo list application and the only action that this reducer currently handles is called ADD_TODO we also created a test that makes sure that when the reducer is called with an empty Array and the ADD_TODO action it returns an Array with a single todo element.
In this lesson we will follow the same approach to implement another action called toggleTodo
We're going to start with the test again and this time we are testing a different action and we have a different initial state the state before calling the reducer (stateBefore) now includes two different todos with id 0 and 1. notice how both of them have their completed field set to false
Next I declare the action and the action is as Object with the type property wich is TOGGLE_TODO String and the id of the todo that I want to be "toggled" I declare the state that I expect to receive after calling the reducer (stateAfter) its pretty much the same as before calling the reducer however I expect the todo with id specified in the action or 1 in this case to change its completed field
the reducer must be a "pure function" so at a matter of precaution I call deepFreeze on the state and the action
Finally, just like in the previous lesson, I'm asserting that the result of calling our reducer with the stateBefore and the action is going to be "deeply equal" (toEqual) the stateAfter.
Now, my test is a function so I need to call it at the end of the file And if I run it, it fails because I have not implemented handling this action yet.
I'm adding a new switch case to my reducer and I remember that I should not change the original Array so I'm using the Array.map method to produce a new Array the function I pass as an argument will be called for every todo so if its not the todo I'm looking for, I don't want to change it, so I just return it as is. However if the todo is the one we want to toggle I'm going to return a new Object that all the properties of the original todo Object thanks to the Object spread operator but also an inverted value of the completed field:
Now both of our tests run successfully... And we have an implementation of the reducer that can add and toggle todos.
Code at the end of Video 12:
index.html(usingObjectspread)
Note: While the spread operator is an ES6 Standard for
Array, its only a Draft forObjectproposed for ES7 which means it is not yet available in any Browser! As such I have modified Dan's code to useObject.assign(*see Video #10) which (at least) works in Chrome...:
The works in ALL Modern Browsers Today (Without Babel) way of doing this is:
We can probably all agree that the code is more elegant with the ES7 Object spread operator. But in the interest of having something that works now (without Babel for running this tutorial in a Chrome without a node.js "workflow"...) I've opted to use the Object.assign method is an ES6 Standard.
Code at the end of Video 12:
index.html(usingObject.assign)
\
13. Reducer Composition with Arrays
Video: https://egghead.io/lessons/javascript-redux-reducer-composition-with-arrays
In the previous lesson we created a reducer that can handle two actions: adding a new todo and toggling an existing todo. Right now the code to update the todo item or to create a new one is placed right inside the todos reducer this function is hard [difficult] to understand because it mixes two different concerns: how the todos Array is updated and how individual todos (Objects) are updated. This is not a problem unique to Redux any time a function does too many things you want to extract other functions from it and call them so that every function only addresses a single concern
In this case I decided that creating and updating a todo in response to an action is a separate operation and needs to be handled by a separate function called todo
As a matter of convention I decided that it should also accept two arguments: the current state and the action being dispatched and it should return the next state. But in this case the state refers to the individual todo and not to the list (Array) of todos.
Finally there is no "magic" in Redux to make it work. We extracted the todo reducer from the todos reducer. So now we need to call it for every todo and assemble the results into an Array. While this is not required in this particular example I suggest that you always have the default case where you return the current state to avoid "odd bugs" in the future.
The Pattern described in this lesson is pervasive in Redux development and is called "Reducer Composition".
Different reducers specify how different parts of the state tree are updated in response to different actions. Reducers are also "normal" JavaScript functions so they can call other reducers to delegate and abstract away handling of updates of some parts of the state they manage this pattern can be applied many times and while there is still a single top-level reducer managing the state of your app you will find it convenient to express it as many reducers calling each other each contributing to a part of the application state tree.
Recap: this video/lesson was simply to show how to extract a method from inside the main ("top-level") reducer and have a separate reducer which handles updates on the individual todo items. While there are more lines of code, the separate reducers are more maintainable
Note that the tests from the previous video still pass after we have created the
todoreducer, because the functionality has not changed, its merely been separated to simplify the main reducer.
Code at the end of Video 13:
index.html
\
14. Reducer Composition with Objects
Tip: This tutorial builds upon the code written in Video/Lesson 13. If you skipped it, or left a break between watching the videos, go back and re-acquaint yourself before proceeding.
Video: https://egghead.io/lessons/javascript-redux-reducer-composition-with-objects
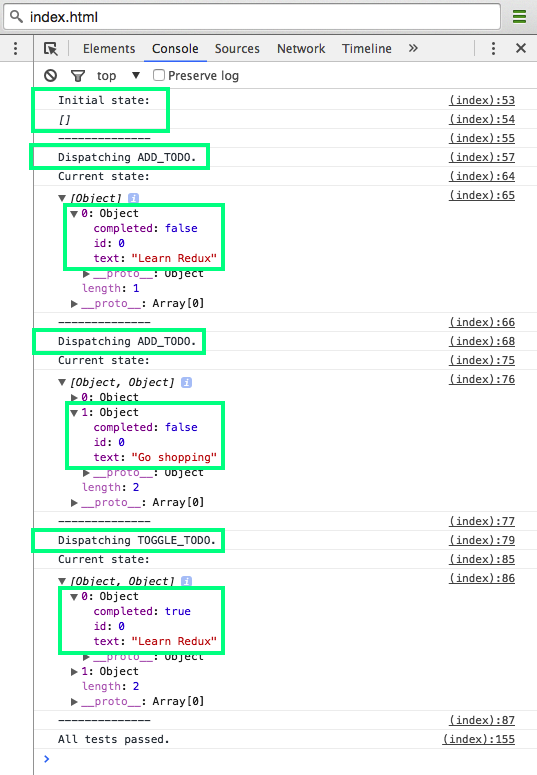
In the previous lesson we established the pattern of "*Reducer Composition" where one reducer can be called by another reducer to update items inside an array. If we create a store with this reducer and log its state we will find that the initial state of it is an empty Array of todos and if we dispatch an ADD_TODO action we will find that the corresponding todo has been added to the state Array if we dispatch another ADD_TODO action the corresponding todo will also be added at the end of the Array. And dispatching a TOGGLE_TODO action with id (set to) 0 will flip the completed field of the todo with id zero (0).
The new code not in the previous tutorial is:
or you can run:
index.html(Code Snapshot for Video 14 @ 0:40) which has the following developer console output:
Representing the whole state of the application as an Array of todos works for a simple example but what if we want to store more information? For example we may want to let the user choose which todos are currently visible with a visibilityFilter such as SHOW_COMPLETED, SHOW_ALL or SHOW_ACTIVE.
The state of the visibilityFilter is a simple String representing the current filter and it is changed by the SET_VISIBILITY_FILTER action.
To store this new information, I don't need to change the existing reducers, I will use the Reducer Composition Pattern and create a new reducer that calls the existing reducers to manage parts of its state and combines the results in a single state Object note that the first time it runs, it will pass undefined as the state to the "child" reducers because the initial state of the combined reducer is an empty Object so all its fields are undefined this gets the "child" reducers to return their initial state and populates the state Object for the first time.
Code Snapshot for Video 14 @ 1:45
index.html
When an action comes in, it calls the reducers with the parts of the state that they manage and the action and combines the result into the new State object. This is another example of the Reducer Composition Pattern but this time we use it to combine several reducers into a single reducer that we will now use to create our store.
The initial state of the combined reducer now contains the initial state of the independent reducers and any time an action comes in those reducers handle the action independently this pattern helps scale Redux development because different people on the team can work on different reducers handling the same actions without running into each other and causing merge conflicts.
Note: This
actionis merely setting thevisibilityFilterproperty of thestoreObject
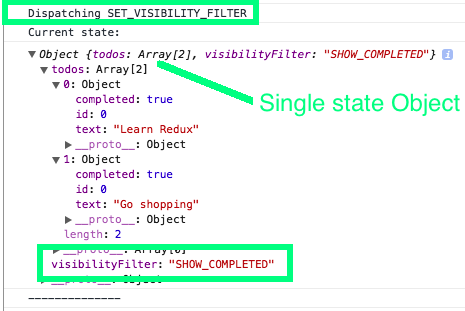
NOTE: this code does not actually do anything to the *UI yet. (be patient that's next...)
Finally I'm dispatching the SET_VISIBILITY_FILTER action and you can see that it does not affect the todos but the visibilityFilter field has been updated.
Code Snapshot for End of Video 14:
index.html
\
15. Reducer Composition with combineReducers()
Video: https://egghead.io/lessons/javascript-redux-reducer-composition-with-combinereducers
In the previous lesson we learned how to use the "Reducer Composition" Pattern to let different reducers handle different parts of the state tree and then combine their results. In fact this pattern is so common that it's present in most Redux applications. And this is why Redux provides a function called combineReducers that lets you avoid writing this code by hand and instead it generates the top-level reducer for you.
The only argument to combineReducers is an Object and this Object lets me specify the mapping between the state field names and the reducers managing them:
The returned value of the combineReducers call is a reducer function which is pretty much equivalent to the reducer function I wrote by hand previously [See: Video 14 above]
The keys of the Object that I configure combineReducers with correspond to the fields of the state Object its going to manage.
The values of the Object I pass to combine reducers are the reducers it should call to update the corresponding state fields this combined reducer call says that the todos field inside the state object manages will be updated by the todos reducer and the visibilityFilter field inside the the state Object will be will be updated by calling the visibilityFilter reducer and the results will be assembled into a single Object in other words it behaves pretty much exactly as the function commented out below:
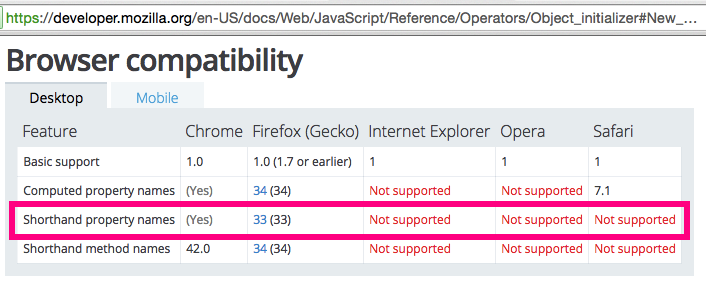
Finally I will establish a useful convention: I will always name my reducers after the state keys they manage since the key names and the value names are now the same I can omit the values thanks to the ES6 Object Literal Shorthand Notation:
In this lesson you learned how to generate a single reducer that calls many reducers to manage parts of its state by using the combineReducers utility function.
Code Snapshot for End of Video 15
index.html
Read more about ES6 Object Literal _Shorthand_** Notation**
https://developer.mozilla.org/en-US/docs/Web/JavaScript/Reference/Operators/Object_initializer#New_notations_in_ECMAScript_2015
Good examples: https://eslint.org/docs/rules/object-shorthand.html (by Nicholas C. Zakas)
NOTE: as usual, while ES6 Object Literal Shorthand Notation is a Standard it is still not implemented in the majority of web browsers:
I have a strong bias towards explicitly typing the Values in an
Objectliteral for clarity. But given the naming convention in Redux, its pretty safe to omit them in this case.
\
16. Implementing combineReducers() from Scratch
Video: https://egghead.io/lessons/javascript-redux-implementing-combinereducers-from-scratch
In the previous lesson we learned to use the combineReducers function which comes with Redux and generates one reducer from several other reducers delegating to them parts of the state tree.
To gain a deeper understanding of how exactly combineReducers works we will implement it from scratch in this lesson.
combineReducers is a function so I'm writing a function declaration and its only argument is the mapping between state keys and the reducers, so I'm just going to call it reducers.
The returned value is supposed to be a reducer itself so this is a function that returns another function and the signature of the returned function is a reducer signature it has the state and the action now I'm calling the Object.keys method (IE9+) which gives me all the keys of the reducers Object in our example this is todos and visibilityFilter next I am calling the (Array) reduce method on the keys because I want to produce a single value such as the nextState by accumulating over every reducer key and calling the corresponding reducer each reducer passed to the combined reducers function is only responsible for updating a part of the state this is why I'm saying that the nextState by the given key can be calculated by calling the corresponding reducer by the given key with the current state by the given key and the action the Array.reduce wants me to return the next accumulated value from the callback so I am returning the nextState and I'm also specifying an empty Object as the initial nextState before all the keys are processed. And there we have it this is a working re-implementation of combineReducers utility from Redux
Lets briefly recap how it works. I'm calling combineReducers with an Object who's values are the reducer functions and keys are the state fields they manage inside the generated reducer I'm retrieving all the keys of the reducers I passed to combineReducers which is an Array of Strings (specifically) todos and visibilityFilter (in our example). I'm starting with an empty Object for my nextState and I'm using the Reduce operation over these keys to fill it gradually. Notice that I am mutating the nextState Object on every iteration this is not a problem because it is an Object I created inside the reducer it is not something passed from outside so reducer stays a "pure" function. To calculate the nextState for a given key it calls the corresponding reducer function such as todos or visibilityFilter the generated reducer will pass to the child reducer only a part of its state by the key so if its state is a single Object its only going to pass the relevant part such as todos or visibilityFilter depending on the current key and save the result in the nextState by the same key
Finally we use the Array.reduce operation (method) with the empty Object as the initial nextState that is being filled on every iteration until it is the return value of the whole .reduce operation
In this lesson you learned how to implement the combineReducers utility that comes with Redux from scratch it is not essential to use in Redux so it is fine if you don't fully understand how it works yet however it is a good [great!] idea to practice functional programming and understand that functions can take other functions and return other functions because knowing this will help you get more productive in Redux in the long term.
\
17. React Todo List Example (Adding a Todo)
Video: https://egghead.io/lessons/javascript-redux-react-todo-list-example-adding-a-todo
In the previous lesson we learned how to split the "root" reducer into many smaller reducers that manage parts of the state tree and now we have a ready todoApp reducer that handles all the actions of our simple todo application.
So now it's time to implement the view layer and I'm going to use React in this example
I'm adding React and React-DOM packages from the Facebook CDN and I'm also adding a div with id='root' which is where I'm going to render my React application
Similar to the React Counter example from the 8th Lesson I declare a render function that is going to update the DOM in response to the current application state and I'm going to subscribe to the store changes and call render when ever the store changes and once to render the initial state:
And the implementation of the render method is going to use React so its calling ReactDOM.render for some TodoApp component I haven't written yet and it renders it into the div I created inside the html called root.
React provides a "base" Class for all components so I'm grabbing it from the React Object its called React.Component and I'm declaring my own TodoApp component that extends the React "base" Component
This Component is only going to have a render function and is going to return a <div> and inside the <div> I'm going to place a <button> saying "Add Todo" but I don't want to add an input field yet to keep the example simple at first so I'm dispatching the ADD_TODO action and I'm going to put Test as my text for the action so it's going to keep adding todos with the text "Test". and the id I need to specify a sequential id so this is why I'm declaring a global variable called nextTodoId and I'm going to keep incrementing it. so every time its going to emit (dispatch an action with) a new id and finally I also want to display a list of the todos so, assuming that I have the todos injected as a todos prop I will call .map and for every todo item I'm going to show a <li> showing the text of that particular todo.
Finally because I need the todos as a prop I'm going to pass it to the TodoApp by reading the the current store state and reading its todos field:
Code snapshot for Video 17 @ 02:56:
index.html
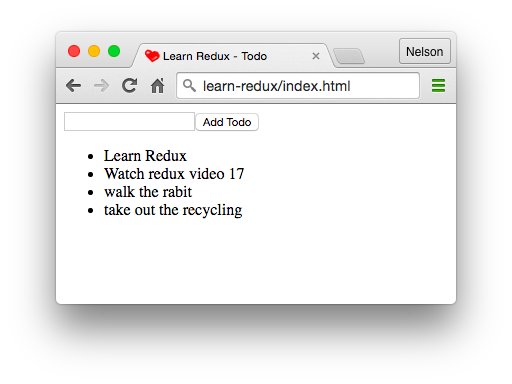
If you open the file in your browser, you should expect to see:
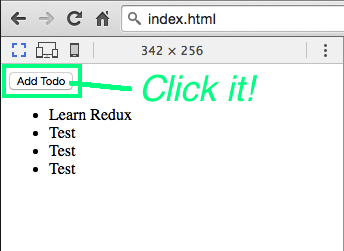
You can see that there is a <button> "Add todo" and any time I press it I see a new todo with the "Test" text.
Now I'm going to add an input inside my render function and I'm using the React callback ref API where ref is a function it gets the node corresponding to the ref and I'm saving that node in this case this.input so I'm able to read the value of the input inside my event handler, I'm reading this.input.value and I'm also able to reset that value after dispatching the action so that the field is cleared.
Now if I try to write something in the input field and press "Add Todo" the ADD_TODO action is dispatched and the field is cleared.
Lets take a moment to recap how this application works.
It starts with the TodoApp React Component and this Component is not aware exactly how todos are being added however it can express its desire to mutate the state by dispatching an action with the type ADD_TODO for the text field it uses the current input value (this.input.value) and it passes an incrementing id as the id of todo every todo needs its own id and in this approach we are just going to increment the counter so it always gives us the next integer as id it is common for React Components to dispatch actions in Redux apps however it is equally important to be able to render the current state my TodoApp Component assumes that it is going to receive todos as a prop and it maps over the todos to display a list of them. using the id as a key. This Component is being rendered in the render function that runs any time the store state changes, and initially. The render function reads the current state of the store and passes the todos Array that it gets from the current state of the store to the TodoApp Component as a prop the render function is called on every store change so the todos prop is always up-to-date this was the rendering part of the Redux flow.
Lets recap how mutations work in Redux: any state change is caused by a store.dispatch call somewhere in the Component. When an action is dispatched the store calls the reducer it was created with with the current state and the action being dispatched and in our case, this is the todoApp reducer which we obtained by combining the visibilityFilter and the todos reducer. It matches the action type in a switch statement and if the action type is ADD_TODO and indeed it is equal to ADD_TODO String in this case it will call the "child" todo reducer, passing it undefined because there is no state for a new todo and the action. We have a similar switch statement inside the todo reducer and the action type is ADD_TODO which returns the initial state of the todo with the id and text from the action and completed field set to false the todos reducer that called it will return a new Array with all existing items and the new item added at the very end as a new todo to the current state
Finally the combined reducer called todoApp will use this new Array as the new value for the todos field in the global state Object so its going to return a new state Object where the todos field corresponds to the Array with the newly added Todo item. The todoApp reducer is the "root" reducer in this application it is the one the store was created with. so its next state is the next state of the Redux store and all the listeners are notified the render function is subscribed to the store changes so it is called again and it gets the fresh state by calling getState and it passes the fresh todos to the Component re-rending it with the new data.
Code at the end of Video 17:
index.html
Which should look like this: (when you open it in Chrome Canary)
\
18. React Todo List Example (Toggling a Todo)
https://egghead.io/lessons/javascript-redux-react-todo-list-example-toggling-a-todo
In the last lesson we implemented a simple UI for the Todo List application that is able to add new todos and view the existing todos in a list to add the todos we dispatched the ADD_TODO action and in this lesson we are going to the TOGGLE_TODO action to toggle the completed state of the todos by clicking on them.
I'm scrolling down to my React Component and I've got a <li> here corresponding to the todo so I'm adding the onClick handler so when the user clicks on the list item I want to dispatch an action to my store with the type TOGGLE_TODO and the id of the todo being toggled which I get from the todo Object
The event handler knows which todo it corresponds to so it is able to pass its id in the action. In the user interface I want the completed todos to appear crossed out. so I'm adding the style attribute to the <li> and I'm going to use the textDecoration property which is going to be "line-through" (strike-through) when completed is true and none when todo.compleded is false so I get a "normal" looking todo. And now if I add a couple of todos I can click on them and they are going to appear toggled:
Code snapshot for Video 18 @ 1:25:
index.html
When you run it (in Google Chrome Canary) you should expect to see:
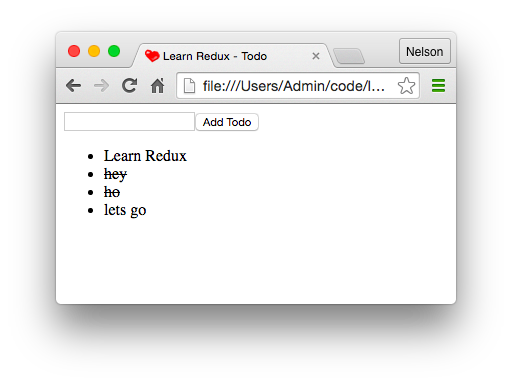
... And I can toggle them back. Isn't that satisfying...?
Lets recap how toggling the todo actually works. it starts with me dispatching the TOGGLE_TODO action inside my onClick handler with the type TOGGLE_TODO and the id which is the id of the todo being rendered I get the todo Object as an argument to the Array.map callback inside my render method where I render all the todos when an action is dispatched the store will call the "root" reducer which will call the todos reducer with the Array of todos and the action and in this case the action type is TOGGLE_TODO so the todos reducer delegates the handling of every todo to the todo reducer with a .map function to call it for every todo item. So the todo reducer receives the todo as state and the action again we switch on the action.type and it matches TOGGLE_TODO String and now for every todo who's id does not match the id specified in the action we just return the previous state that is the todo Object as it was however if the id of the todo matches the one specified in the action we are going to return a new Object with all the properties of the original todo but with the completed field equal to the opposite value of what it was; e.g: completed: !state.completed
The updated todo item will be will be included in the todos field under the new application state and because we subscribe the render function its going to get the next state of the application in store.getState() and pass the new version of the todos to the TodoApp Component. Which is going to render the updated todos.
Finally the (CSS) style of the <li> depends on the todo.completed field which we just updated which is why it re-renders in a crossed-out state.
Code at the end of Video 18:
index.html
\
19. React Todo List Example (Filtering Todos)
Video: https://egghead.io/lessons/javascript-redux-react-todo-list-example-filtering-todos
In the previous two lessons we were working on creating the user-interface for the Todo List Application that displays the todos lets us add new todos and "toggle" them onClick we implemented that by dispatching ADD_TODO and TOGGLE_TODO actions that we already know how to handle in our reducers.
In this lesson we are going to dispatch SET_VISIBILITY_FILTER action and use the visibilityFilter field to only show the todos the user wants to see; either the completed todos, active todos or all the todos in the current state.
I'm starting by creating a new Component, a functional Component called FilterLink that user needs to click to switch the current visible todos. and the FilterLink accepts filter prop which is just a String and the children which is the content of the link. and its going to be a simple <a> ("anchor") tag that doesn't really link anywhere, its going to prevent the navigation when clicked and its going to dispatch and action with a type SET_VISIBILITY_FILTER and passing the filter prop so that the reducer knows which filter is being clicked. I will pass the children down to the <a> tag so the "consumer" can specify the text of the link Now I can use it in my TodoApp Component.
Just below the todo list I'm adding a paragraph where I'm going to offer the user the choice as to which todos should be currently visible by using the FilterLink Component I just created. The filter prop is one of these possible values such as SHOW_ALL which corresponds to showing every todo in the state SHOW_ACTIVE which means just show the todos that are not completed yet, and SHOW_COMPLETED which means show the completed todos.
So I'm copy-pasting the FilterLink and I'm changing the labels and the filters corresponding to it running this code will give me 3 different things under the list of todos. Clicking on them will change the state.visibilityFilter field however it doesn't have any effect yet. because we don't interpret the value of the visibilityFilter
I'm creating a new function that is going to help me filter the todos according to the the filter value, its called getVisibleTodos it accepts two arguments: the todos and the filter and it switches on the current filter value so if the filter is SHOW_ALL its going to return all of the todos but if the filter is SHOW_COMPLETED its going to call todos.filter() (that is the Array.filter method) to only return those todos that have completed set to true and SHOW_ACTIVE is going to be the opposite of that its going to return only those todos that where completed field is false.
Now I need to call this function to filter the todos before rendering them so in the render function of the TodoApp Component I get the visibleTodos by calling the getVisibleTodos with the todos and the visibilityFilter values from my props and I'm going to use the visibleTodos instead of this.props.todos when I enumerate them for rendering.
Code snapshot for Video 19 @ 03:45:
index.html
Finally I now use the visibilityFilter inside my TodoApp Component so I need to pass it as a prop and I can do this explicitly but its easier just to "spread" over all the state fields so every property of the state Object is passed as a prop to the TodoApp Component this way it receives the visibilityFilter and if I add some todo items and then click on them so I change their completed fields and then click on the visibilityFilter links the currently visible todos are rendered according to the chosen visibilityFilter.
The links look all the same right now but we want to highlight the chosen one. To implement this, we're going to need the visibilityFilter prop which says which is the current one. I'm changing the beginning of the render method to "destructure" the todos and visibilityFilter from the props so I can access them directly without typing this.props every time.
NOTE: ES6 Destructuring assignment is not supported in Chrome yet, so I'm not using this in the code example. so Instead of:
I'm using:
and I'm going to pass the visibilityFilter to every FilterLink so it can know which filter is the current one and apply different styling if the currentFilter matches the FilterLink's own filter.
After passing the currentFilter prop to every FilterLink I go back to the FilterLink declaration and I'm adding currentFilter as a prop to it and I'm adding a condition that says that when the filter is the currentFilter that is when the link is active I want to return a <span> instead of a link because I don't want it to be clickable, I want it to be static text this completes the user-interface of our Todo List example it lets us add items, it lets us view items, toggle them as completed and when we switch the visibilityFilter it displays only relevant todos and it also updates the link appearance so we see which link is active.
Lets recap how changing the visibilityFilter works it starts with a dispatch call with an action of the type: 'SET_VISIBILITY_FILTER' and it passes filter which is a prop to the FilterLink Component so every one of those 3 links is going to have a different filter prop it passes in the action. The store.dispatch function will call our root reducer with the state and the action which in turn will call the visibilityFilter reducer with the part of the state and the action. Note that when the action.type is SET_VISIBILITY_FILTER it doesn't care for the previous state it just returns the action.filter as the next value, the next state of the visibilityFilter reducer the root reducer will use this new field as part of its new state Object and because the render function is subscribed to the store changes ( store.subscribe(render); ) its going to get this new state Object and pass all its keys as props to the TodoApp Component so the TodoApp Component will receive the todos and the updated visibilityFilter as its props both its props are passed to the getVisibleTodos function which calculates the currently visibleTodos according to a list of all todos and the visibilityFilter and the filter is just a String saying SHOW_ALL, SHOW_COMPLETED or SHOW_ACTIVE and the returned value is a new Array of todos that in some cases filters them and in some cases returns as is and the SHOW_COMPLETED and SHOW_ACTIVE are only different in their predicates.
The return value is the Array of visibleTodos and it is used in the render function to actually enumerate every todo and render it and the visibilityFilter field is also used by the FilterLink as the currentFilter because the FilterLink wants to know whether its filter is the current one in order to render a <span> instead of a link (<a> tag). This is how clicking a link makes it appear selected and changes the currently displayed items in the list.
Code at the end of Video 19:
index.html
\
20. Extracting Presentational Components (Todo, TodoList)
Video: https://egghead.io/lessons/javascript-redux-extracting-presentational-components-todo-todolist
In the last few lessons we created the user interface for a simple React and Redux Todo List where I can add items, toggle them as completed and change the currently visible Todos and we do that by having a single TodoApp Component that the <input>, the <button> for adding todos the list of currently visible todos with onClick handler and it has these 3 links that let us change the currently visible todos. The single Component approach worked so far, however we really want to have many components that can be used tested and changed by different people separately so we are going to re-factor our application in this lesson.
The first Component I want to extract from the TodoApp Component is the Todo Component that renders a single <li> I'm declaring the Todo Component as a function which React 0.14 allows me to do. I'm not sure which props its going to have so I will leave them blank for now and I will just paste the <li> I copied before.
The first thing I am doing is removing the special key property because it's only needed when I am enumerating an Array and I will use it later when enumerating many todos. One of my goals with this refactoring is to make every Component as flexible as it is reasonable. Right now I have hard-coded that clicking a todo always causes the TOGGLE_TODO action and this is perfectly fine to do in your app however I prefer to have a bunch of Components that don't specify any behaviors and that are only concerned with how things look or how they render and I call such Components the "presentational" Components I would like to keep Todo a "Presentational" Component so I remove the onClick handler and I promote it to be a prop so that anyone who uses the Todo Component can specify what happens on the click and you don't have to do this in your Redux apps but I find it to be a very convenient pattern. Finally while it does not make a lot of difference, I prefer to keep it explicit what is the data that the Component needs to render so instead of passing a todo Object I pass completed and text fields as separate props. note: how the Todo Component is now a purely "Presentational" Component and does not specify any behavior but it knows how to render a todo.
The next Component I create is called TodoList and it's also a "Presentational" Component its only concerned with how things look and it accepts an Array of todos and is going to render an <ul> (unordered list) of them by calling the todos map function (Array.map) and rendering a Todo component for every todo. it tells React to use todo.id as the unique key for the elements and it spreads over the todo Object properties so that text and completed end up as props on Todo Component now I need to specify what happens when a Todo is clicked and I could have dispatched an action here and again, that would be fine but I want it to be a "Presentational" Component so I'm going to call another function called onTodoClick and pass the id of the todo and let it decide what should happen so onTodoClick is another prop for the TodoList both Todo and TodoList are "Presentational" Components so we need something I call "Container" Components to actually pass the data from the store and to specify the behavior
In this case the top-level TodoApp Component acts as a "Container" Components and we will see more examples of "Container" Components in the future lessons. In this case you just render the TodoList with visibleTodos as the todos and with a callback that says that when onTodoClick is called with a todo.id we should dispatch an action on the store with the type TOGGLE_TODO and the id of the todo.
Let's recap again how this works: The TodoApp Component renders a TodoList and it passes a function to it that can dispatch an action the TodoList Component renders the Todo Component and passes onClick prop which calls onTodoClick the Todo Component uses the onClick prop it receives and binds it to the <li> onClick this way when its called the onTodoClick is called and this dispatches the action and updates the visibleTodos because the action updates the store.
Complete Code at the end of Video 20:
index.html
\
21. Extracting Presentational Components (AddTodo, Footer, FilterLink)
Video: https://egghead.io/lessons/javascript-redux-extracting-presentational-components-addtodo-footer-filterlink
In the previous lesson I extracted the Todo and TodoList Components from the TodoApp Component. In this lesson I will continue extracting other "Presentational" Components to separate the looks from the behavior. Now I want to extract the <input> and the <button> into a separate Component called AddTodo. I'm declaring AddTodo as a "Functional Component" that does not accept any props and I'm going to return these cut-pasted <input> and <button> but I'm wrapping them in a <div> because a (React) Component needs to have a single root element.
The Functional Components don't have instances however instead of using this, I can use a local variable called input that I'm going to "close over" so that I can write to it in the callback ref and I can read from it in the event handler. Like previously I want it to be a "Presentational" Component and not specify behavior so I'm just calling a function called onAddClick passing the current input value and I make onAddClick a prop so that the Component that uses AddTodo can specify what happens when Add button is clicked.
Again, the TodoApp Component acts as a "Container" Component for the AddTodo and it specifies that when the add <button> is clicked we should dispatch an action with the type: 'ADD_TODO' the corresponding text and the nextTodoId.
The last Component I want to extract is the footer which contains all these three FilterLink. I'm creating a new "Functional" Component called footer and I'm not sure which props it needs so I skip them and I paste the markup. It seems that the FilterLink need the visbilityFilter so I add it as a prop. I would like the Footer and the FilterLink to be "Presentational" Components however the FilterLink currently includes a store.dispatch call. I'm replacing it with an onClick call and I pass the filter as the single parameter for the calling Component's convenience I add onClick to the props and now I need to specify it every time FilterLink is used so I add onFilterClick to the Footer and I pass onClick={onFilterClick} for every link in the Footer so what ever we pass to the Footer as onFilterClick prop is going to end up in the FilterLink as onClick.
Now I can use the Footer Component I just defined inside my TodoApp Component and I need to pass two props one of them is the visibilityFilter so it can highlight the active link and another prop is onFilterClick where I say that whenever a Filter is clicked I want to dispatch an action with the type: 'SET_VISIBILITY_FILTER' and the filter being clicked.
Finally I just noticed that the TodoApp Component doesn't actually have to be a Class, I can turn it into a function and I prefer to do that when possible. Instead of destructuring the props inside the render method I am now doing it inside the arguments. I can remove now the destructuring and I can also remove the render method declaration the visibleTodos are only used in a single place so I'm moving the getVisibleTodos call to the TodoList todos prop declaration.
Now the body of my function is just a single expression so I can get rid of the return statement and un-indent the code to make it look nicer.
Full code snapshot for Video 21 @ 04:12:
index.html
*This version of
TodoAppis so much cleaner... IMO.
This concludes the initial refactoring of the Todo List Application into a single "Container" Component called TodoApp and many "Presentational" Components that are only concerned with how things look.
Lets re-cap the data flow in this example: We have a single "Container" Component called TodoApp and we re-render it any time the store changes it receives the keys of the global state Object as the props so it receives the todos and the visibilityFilter values the first Component it renders is called AddTodo. AddTodo is a "Presentational" Component that renders an <input> and a <button> and when the <button> is clicked it passes the current <input> value to the onAddClick function. onAddClick function is a prop for the AddTodo Component in this case it is specified by the TodoApp which says that when the <button> is clicked it should dispatch an action containing the current text in the action Object. Dispatching the ADD_TODO action will call our reducer update the store state with the new todos and re-render the TodoApp Component with the new todos. The todos themselves are rendered by the TodoList "Presentational" Component that receives two props: the currently visible todos and the onTodoClick callback the TodoList Component receives an Array of todos and it maps over them rendering individual Todo Components it uses the spread operator to pass every property of the todo Object as a prop to Todo Component and it specifies the onClick handler as calling onTodoClick with the id of the particular todo the Todo Component is defined above and it is also a "Presentational" Component so it doesn't specify the behavior it says that when a <li> is clicked it should call the onClick handler being a "Presentational" Component it specifies how the Component looks in different circumstances and in this case it uses the completed prop to chose between two different styles of the todo item the TodoList is also a "Presentational" Component so it delegates actually handling the click to onTodoClick prop and it pass the id of the todo being clicked.
Finally the TodoApp reacts to it by dispatching an action containing the id of the todo clicked and the type: 'TOGGLE_TODO' the store will call our reducer and update the state of the application re-rendering the TodoApp Component with the new todos.
The Footer Component receives the current visibilityFilter as a prop and also receives the onFilterClick callback that sets the current visibilityFilter. The Footer Component renders three FilterLink passing down their respective filter values the onClick handler and the current visibilityFilter the FilterLink Component being a "Presentational" Component doesn't know what to do when it is clicked. so it calls the onClick callback passing the filter which is different for each of those links as an argument the Footer delegates handling the click of the FilterLink to its own prop called onFilterClick.
Finally the TodoApp Component being the "Container" Component in our application specifies the behavior which in this case means that when the FilterLink is clicked it should dispatch and action with the action type: 'SET_VISIBILITY_FILTER and the new filter.
Separation of the "Presentational" Components is not required in Redux. But I recommend this pattern because it de-couples your rendering from Redux. So if you later chose to move your project to another framework such as Relay you will not have to change all your components because you can keep all your "Presentational" Component exactly the same.
This approach also has downsides such as that you have to thread a lot of props through the Components to get them to the "leaf" Components including the callbacks this problem can be easily solved by introducing many intermediate "Container" Components as we will see in the next lesson.
Code at the end of Video 21:
index.html
\
22. Extracting Container Components (FilterLink)
Video: https://egghead.io/lessons/javascript-redux-extracting-container-components-filterlink
In the previous lesson we separated the "Presentational" Components from the the main "Container" Component the TodoApp specifies the behaviors such as what happens when the Add <button> is clicked how the todos are selected what happens when a single Todo has been clicked and what happens when a Footer Link is clicked. And the components such as AddTodo, the TodoList, the Todo itself the Footer and the FilterLink they don't dispatch actions they call their callbacks [passed] in the props so they are only responsible for the looks but not for the behavior. The downside of this approach is that I have to pass a lot of props down the "tree" even when the intermediate Components don't really use them for example: the FilterLink needs to know the currentFilter so that it can chose a different appearance when it is active however, in order to receive the currentFilter it has to be passed down from the top, so this is why the Footer has to accept visibilityFilter as a prop so it can pass it down as a currentFilter to the FilterLink.
In a way this breaks encapsulation because the "Parent" Components need to know too much about what data the Child Components need so to solve this we are going to extract a few more "Container" Components just like we extracted the "Presentational" Components in the previous lesson.
The first Component I'm going to re-factor is the Footer Component and currently it accepts two props the visibilityFilter and the onFilterClick callback, but it doesn't actually use either of them, it just passes them down to the Filterlink so this seems like a good opportunity for simplification. We can only do this because we know that the Footer Component doesn't care about the values of these props they only exist to be passed down to the Filterlink that cares about them.
I'm removing the props definition and I'm removing these props from the FilterLink usage and it might start to seem a lot like the code before separating the "Presentational" Components however what I want to do here is a little bit different.
The FilterLink does not currently specify the behavior for clicking on the link it also needs the currentFilter to tell whether it should be rendered as active therefore its a bit "dishonest" to say that FilterLink is a "Presentational" Component because it is inseparable from its behavior the only reasonable reaction to clicking on it is setting the visibilityFilter by dispatching an action this is why I am changing it to a different "Presentational" Component I'm going to call Link and I will create another FilterLink Component as a Container that uses it for rendering.
The Link Component doesn't know anything about the Filter it only accepts the active prop and calls its onClick handler it is only concerned with rendering however I am also creating another Component called FilterLink and its going to be a Class this time. It's going to render the Link with the current data from the store. It's going to read the props, the Component props and it's going to read the state but I don't mean the React state I mean the Redux store state it gets by calling store.getState(). As a "Container" Component the FilterLink doesn't have its own markup and it delegates rendering to the Link "Presentational" Component. In this case it calculates its active prop by comparing its own filter prop with the visibilityFilter in the Redux store state. The filter prop is the one that is passed to the FilterLink from the Footer and the visibilityFilter corresponds to the currently chosen visibilityFilter that is held in the Redux store state. and if they match we want the Link to appear active (un-clickable). The "Container" Component also needs to specify the behavior so in this case the FilterLink specifies that when this particular link is clicked we should dispatch the action with the type: 'SET_VISIBILITY_FILTER' and the filter value that we take from the props the FilterLink may accept "Children" which are used as the contents of the Link so we are going to pass the children down to the Link Component which is going to render them inside the <a> tag.
There is a small problem with this implementation of FilterLink inside the render method it reads the current state of the Redux store however it is not subscribed to this store. So if the Parent Component does not update when the store is updated its going to render the "stale" value.
Currently we re-render the whole application when the state changes however this is not very efficient so in future we will instead move the subscription to the store to the lifecycle methods of the "Container" Components. React provides a special forceUpdate method on the Component instances to force their re-rendering and we're going to use it together with store.subscribe method so that any time the store state changes we forceUpdate the "Container" Components. We perform the subscription inside the componentDidMount lifecycle method so its important to to unsubscribe inside the componentWillUnmount method.
Note that we don't actually have the unsubscribe method, but this is the returned value of the store.subscribe method so we can keep it and then call it in componentWillUnmount.
Let's re-cap this part: the FilterLink Component subscribes to the store calling forceUpdate any time the store changes so it can render the current state of the store. it saves the reference to the unsubscribe function returned by store.subscribe and it invokes it when the Component is about to Unmount to clean up the subscription.
Let's re-cap the relationship between the FilterLink "Container" Component and the Link "Presentational" Component: The Link Component only specifies the appearance of a link when it is active or inactive but it doesn't know about the behavior. The FilterLink Component is a Container so it provides the data and the behavior for the "Presentational" Component. When it mounts it subscribes to the store so it independently re-renders when the store state changes because it needs to use the store current state inside its render method. Instead of specifying the DOM tree it delegates all the rendering to the Link "Presentational" Component and its only job is to calculate the props base on its own props and the current state of the Redux store and it also specifies the callbacks that are going to dispatch the actions on the store.
After the action is dispatched the store will remember the new state returned by the reducer and will call every subscriber to the store and this case every FilterLink Component instance is subscribed to the store so they will all have their forceUpdate methods called on them and they will re-render according to the current store state.
The FilterLink is a "Container" Component so it is completely self-sufficient and can be used inside the "Presentational" Components such as Footer without passing additional props to get the data from the store and specify the behavior this lets us keep the Footer Component simple and de-coupled from the behavior and data that its child Components need.
Code at the end of Video 22:
index.html
\
23. Extracting Container Components (VisibleTodoList, AddTodo)
Video: https://egghead.io/lessons/javascript-redux-extracting-container-components-visibletodolist-addtodo
In the previous lesson I separated the Link "Presentational" Component from the FilterLink "Container" Component that is subscribed to the Redux store and that provides the data and the behavior for the Link Component it renders. While it makes the data flow a little bit less explicit it makes it easier to use FilterLink in any Component without worrying about passing additional data to the FilterLink or to the Component that contains it.
In this lesson we will continue extracting the "Container" Components from the top-level "Container" Component and the first candidate is the TodoList Component.
I actually want to keep the TodoList a "Presentational" Component however I want to encapsulate within the currently visible Todos into a separate "Container" Component that connects the TodoList to the Redux store so I'm going to call this Component the VisibleTodoList. Just like when declaring the FilterLink Component in the previous lesson, I calculate the data for the current Component by using the current state which is the state from the Redux store and I'm using the getVisibleTodos function to calculate the currently visible todos based on all the todos from the Redux store and the current visibilityFilter from the Redux store state and I'm specifying the behavior as well I'm saying that when the todo is clicked we should dispatch an action with type: 'TOGGLE_TODO' and the id of the todo being clicked. All "Container" Components are similar their job is to connect a "Presentational" Component to the Redux store and specify the data and the behavior that it needs.
I'm scrolling up to the FilterLink Container Component I wrote in the previous lesson to cut-paste the store subscription logic:
Just like the FilterLink the VisibleTodoList is going to subscribe to the store and force an update any time the store state changes because it uses the state in its render method. Now that the VisibleTodoList is connected to the Redux store we can use it instead of the TodoList and we no longer have to pass all the props from the top.
Finally in the previous lesson I made AddTodo a Presentational Component but I'm going to back-track on this now. I will cut-paste the dispatch call back inline into the onClick handler inside the Component because there isn't really a lot of presentation or behavior here and its easier to keep them together until we figure out how to split the presentation. For example if in the future we're going to have something like a <form> Component we may split it but for now we'll keep them together.
I'm scrolling down to my TodoApp Component and I'm removing the onAddClick prop and I just noticed that none of the Containers actually need props from the state so I can remove the props of the TodoApp Component and I can remove the render function that renders the TodoApp Component with the current state of the store because I can just call it once remove all the props that are related to the state and just render it as is because the Container Components that I render are going to subscribe to the store themselves and are going to update themselves when the store state changes.
Lets re-cap the data flow after separating the Presentational and the Container Components.
There is just one ReactDOM.render call at the very end and we don't render again when the store state changes because the Container Components take care of that! The first Component I'm looking at is called AddTodo and frankly I can't classify it either as a Presentational Component or as a Container Component because it doesn't fit either category. The <input> and the <button> are the Presentational part but dispatching an action onClick is the behavior which is usually specified by the Container however in this case I'd rather keep them together because there isn't any state, the UI is very simple and its hard to imagine any other behavior other than dispatching the ADD_TODO action.
The second Component I render inside the TodoApp is VisibleTodoList, and this time it is a "proper" Container Component that subscribes to the store and re-renders the TodoList any time the store state changes and it calculates the visibleTodos from the current Redux store state, the todos and visibilityFilter fields and it passes them as the todos (prop) and when the todos are clicked its going to dispatch an action with the type:'TOGGLE_TODO' and the id of the respective todo the actual rendering here is performed by the TodoList Component that just renders the Todos passed through as prop and binds their clicks to the onTodoClick prop.
Finally the last Component the TodoApp renders is the Footer and the Footer is just a Presentational Component rendering 3 different FilterLinks. The FilterLink is a Container Component so it subscribes to the store and it renders the Presentational Component called Link calculating weather it should be active based on its props the current Redux store state and it specifies the behavior (what happens when it's clicked). Finally the Link Component is just a Presentational Component that renders an <a> tag.
Separating the Container and the Presentational Components is often a good idea, but you shouldn't take it as a "dogma"; Only do this when it truly reduces the complexity of your codebase. In general I suggest first trying to extract the Presentational Components, and if there is too much boilerplate passing the props to them then you can create the Containers around them that load the data and specify the behavior.
Code at the end of Video 23:
index.html
\
24. Passing the Store Down Explicitly via Props
Video: https://egghead.io/lessons/javascript-redux-passing-the-store-down-explicitly-via-props
In the previous lessons we used the store top level variable to refer to the Redux store. The Components that access the store such as the Container Components read the state from it, subscribe to the store and dispatch actions on the store using the store top level variable. This approach works fine for a "JS Bin" example where everything is in a single file however it doesn't scale to "real" applications for several reasons. First of all it makes your Container Components harder to test because they reference a specific store but you might want to supply a different "Mock" store in the Tests. Secondly it makes it very hard to implement "Universal Applications" that are rendered on the server because on the server you want to supply a different store instance for every request because different requests have different data.
I'm going to start by moving the store creation code to the bottom of the file where I render my React Components. I'm going to change it slightly and instead of creating the store top level variable I will pass the store I create as a prop to the top level Component so it is completely "injectable" to it. Every Container Component needs a reference to the store so unfortunately we have to pass it down to every Component as a prop. Its less effort than passing different data to every Component but its still inconvenient so don't worry, we'll find a better solution later. But for now we need to see the problem.
The problem is that the Container Components need to have the store instance to get the state from it, dispatch actions and get the changes. So this time I'm changing the Container Component to take the store from the props using the ES6 Destructuring Syntax which just means const { store } = props.store; ...
Note: destructuring Objects is not yet available in any browser, so I'm using "traditional" variable assignment:
const store = props.store;(almost identical!)
And I'm doing the same here, just taking the store from the props so I can call dispatch on it.
I need to make similar changes to other Container Components and in this case I have this AddTodo Component, which is not exactly a Container Component but it still needs the store to dispatch the ADD_TODO action so I add it as a prop. And I'm also going to add the store to the Footer Component because unfortunately FilterLink needs it and the Footer Component renders FilterLink. So this is not convenient but as I said, we'll figure out a way to avoid this later but for now we need to pass the store down so that every Container Component such as FilterLink can use it to subscribe to the changes, to read the state and to dispatch actions without relying on a top-level variable being available. I'm changing the render method to read the store from the props and now all Containers read the store instance from the props and don't rely on a top-level variable that I removed.
Note that this change did not change the behavior or data flow of this application. The Container Components subscribe to the store just like before and update their state in response to its changes, however what changed is how they access the store. Previously they would access a top-level variable but this approach does not scale to "real world" applications and this is why right now I'm passing down the store as a prop so the Container Components can subscribe to it.
In the future lessons we will see how to pass the store down to the Container Components implicitly but without introducing the top level variable.
Code at the end of Video 24:
index.html
\
25. Passing the Store Down Implicitly via Context
Video: https://egghead.io/lessons/javascript-redux-passing-the-store-down-implicitly-via-context
In the previous lesson we got rid of the top-level store variable and instead started passing the store as a prop to the TodoApp Component so every Component below received the store as a prop. And we even have to do this for Presentational Components because sometimes they contain Container Components that need the store to subscribe to the changes. We have to write a lot of "boilerplate" code to pass the store down as a prop but there is another way using the "advanced" React feature called "Context".
I'm creating a new Component called Provider and from its render method it just returns what ever its child is. So we can wrap any Component in a Provider and it's going to render that Component.
I'm changing the render call to render a TodoApp inside the Provider and I'm moving the store prop from the TodoApp to the Provider Component.
The Provider Component will use the React advanced Context Feature to make the store available to any Component inside it including "Grand Children". To do this it has to define a special method called getChildContext that will be called by React. We are using this.props.store which corresponds to store passed to the Provider as a prop just once. this store will be part of the Context that the Provider specifies for any "Children" and "Grand Children" so the TodoApp is going to receive this Context and any Component inside TodoApp is going to receive this Context Object with the store inside it. However there is an important condition for the Context to work, and this condition is that you have to specify childContextTypes on the Component that defines getChildContext these are just React.PropTypes definitions but unlike PropTypes, the ChildContext Types are essential for the Context to be turned on. If you don't specify them, no Child Components will receive this Context.
The Container Components currently access store by props but we are going to change this to read the store from React Context and to do that we just refer to this.context similarly in the render method I'm also going to read the store from the Context instead of the props:
Finally the Context is "Opt In" for the receiving Components too so you have to specify a special field called contextTypes which are similar to childContextTypes but in this case we are specifying which Context we want to receive and not pass down.
If you forget to declare the contextTypes the Component will not receive the relevant Context so it is essential to remember to declare them.
What about the functional Components that don't have this (JavaScript context). It turns out that they also receive the Context but as a second argument after the props so I'm destructuring the second argument and getting the store from there and the second argument is the Context. Just like with the class Components I still have to add a property called contextTypes that specifies which Context I want to receive and in this case I want to receive the store from the Provider. If I forget to declare the contextTypes my functional Component will not receive the relevant Context as the second argument.
So, its important to remember to declare them any time you use the Context. Finally I'm replacing the props with the context when getting the store for the FilterLink and I'm adding the contextTypes declaration to the FilterLink so it receives the relevant Context from the Provider. Now that the FilterLink receives the store by context I no longer need to pass it as a prop so I'm removing its usage (from the Footer Component) and I'm also removing the store prop from the Footer because it doesn't need to pass it down anymore.
I'm also removing the store prop from the TodoApp Component because I no longer need to pass it down to the Containers. Now instead of explicitly passing the store down by props, we pass it implicitly by context.
Lets recap how we use the context to pass the store down: We start by rendering the TodoApp inside the Provider Component we defined above. The Provider Component just renders what ever you pass to it so in this case it renders its "Children" or [more specifically] the TodoApp component however it also provides the context to any Components inside it, including "Grand Children" the context contains just one key called the store and it corresponds to the store we passed as a prop to the Provider Component. We pass the store to the Provider Component in our render call and make it available to "Child Components" by defining the getChildContext with the store key pointing to that prop. It is essential that the getChildContext is matched by childContextTypes where we specify that the store key has PropTypes of object.
Note: that the
childContextTypesdefinition is absolutely required if you want to pass thecontextdown the tree.
The benefit is that we don't need to pass the store through the intermediate components and instead we can declare the contextTypes on the Container Components that need access to the store so that they can retrieve it from the context instead of retrieving it from the props. The context creates something like a "worm hole" between the VisibleTodoList Component that reads the context and the Provider that provides the context and this "worm hole" is only enabled because the contextTypes declared on the VisibleTodoList include the store that is defined in childContextTypes of the Provider Component.
The AddTodo is another Component that needs access to the store so it also opts-in to receiving it in the context by specifying the contextTypes this is why in addition to props, it receives a second argument which is the context I'm using the destructuring syntax here so instead of:
we get a simplified version:
The context works at any depth so it is not necessary to put contextTypes on the Footer the FilterLink is the Component that directly uses the context so this is the component that has to specify the contextTypes so that it can use the store by reading it from the context.
Context is a powerful feature but in a way it contradicts the React philosophy of the explicit data flow. The context essentially allows Global Variables across the Component Tree but Global Variables are usually a Bad Idea ... and unless you're using it for dependency injection like here where we need to make a single Object available to all Components, then probably you shouldn't use context ...
Finally the Context API is NOT Stable in React! It has changed before and it is likely to change again so try your best not to rely on it too much.
Code at the end of Video 25:
index.html
\
26. Passing the Store Down with <Provider> from React Redux
Video: https://egghead.io/lessons/javascript-redux-passing-the-store-down-with-provider-from-react-redux
In the previous lesson we implemented the Provider Component that uses the React "Advanced" Context Feature to make the store from the props available to every Component in our App. So if we pass it to the Provider we can read it in any other Component from the context which is really convenient for the Container Components. In fact this is so convenient that you don't actually need to write the Provider yourself because it is included in a "special library" called React-Redux
And note that this is not the same a Redux, this is a different library these are React bindings to the Redux Library.
You can import the Provider by destructuring the ReactRedux Global Object in JSBin:
or if you use Babel and something like npm you can:
with the braces because it is a named export from the react-redux package. Or if you write ES5 code, you can write:
Just like the Provider we wrote before, the Provider that comes with ReactRedux exposes the store you pass to it as a prop on the context so the Components can specify the contextTypes and then use this.context.store to subscribe to the store updates and dispatch actions.
Code at the end of Video 26:
index.html
\
27. Generating Containers with connect() from React Redux (VisibleTodoList)
Video: https://egghead.io/lessons/javascript-redux-generating-containers-with-connect-from-react-redux-visibletodolist
In the previous lesson I added ReactRedux bindings to the project and I used the Provider Component from ReactRedux to pass the store down the context so that the Container Components can read the store from the context and subscribe to its changes. All Container Components are very similar, they need to re-render when the store state changes they need to unsubscribe from the store when they Unmount. and they take the current state of the Redux store and use it to render the Presentational Components with some props that they calculate from the state of the store and they also need to specify the contextTypes to get the store from the context.
I'm going to write this Component in a different way now: and I'll declare a function called mapStateToProps which takes the Redux store state and returns the props that I need to pass to the Presentational TodoList Component to render it with the current state. In this case there is just a single prop called todos so I cut-paste this expression:
It returns the props that depend on the current state of the Redux store so in this case this is just the todos prop.
I'm creating another function that I call mapDispatchToProps and it accepts the dispatch method from the store as the only argument and returns the props that should be passed to the TodoList Component and that depend on the dispatch method. The only prop that uses store.dispatch is called onTodoClick so I'm copy-pasting [cut-and-pasting] onTodoClick into mapDispatchToProps. Note that I don't have the reference to the store here anymore so instead I'm changing it to use just the dispatch which is provided as an argument to mapDispatchToProps "I will add some punctuation to make it appear easier on my eyes" [parenthesis around the id argument & curly-braces around the function block] onTodoClick is a function that accepts the id of the todo and dispatches an action.
Now I've got two different functions: The first one maps the Redux store state to the props of the TodoList Component that are related to the data from the Redux store the second function maps the dispatch method of the store to the callback props of the TodoList Component it specifies the behavior that is which callback prop dispatches which action.
Together these two functions describe the a Container Component so well that instead of writing it I can generate it by using the connect function provided by the ReactRedux Library:
If you use npm and Babel you will likely import it like this instead:
"and don't forget the curly braces..." [destructuring assignment of the connect method from the react-redux package]
Now, instead of declaring a class I'm going to declare a variable and I will call the connect method to obtain it. I'm passing mapStateToProps as the first argument, and mapDispatchToProps as the second argument. And notice that this is a "curried" function so I have to call it once again and this time I pass the Presentational Component that I want it to wrap and pass the props to.
The connect function will generate the Component will generate the Component just like the one I previously wrote by hand so I don't want you to write the code to subscribe to the store or to specify the contextTypes because the connect function takes care of that.
At 03:27 Dan deletes the "old"
VisibleTodoListComponent and itscontextTypesdefinition which are both now being generated by theconnectcall.
Now lets re-cap how to generate the Container Component using the connect function:
First I write a function called mapStateToProps that takes the state of the Redux store and returns the props for the Presentational Component calculated from it. These props will be updated any time the state changes Next I write a function that I call mapDispatchToProps it takes the store.dispatch method as it's first argument and it returns the props that use the dispatch method to dispatch actions, so it returns the callback props needed for the Presentational Component.
To create a Container Component from them, I import connect from the ReactRedux library and I call it passing mapStateToProps as the first argument and mapDispatchToProps as the second argument. Finally, I close the function call parens, and I open another [pair of] parentheses because this is a curried function and it needs to be called twice and the last argument is the Presentational Component that I want to connect to the Redux store. The result of the connect call is the Container Component that is going to render my Presentational Component it will calculate the props to pass to the Presentational Component by merging the objects returned from mapStateToProps, mapDispatchToProps and its own props.
Complete Code at the end of Video 27:
index.html
\
28. Generating Containers with connect() from React Redux (AddTodo)
Video: https://egghead.io/lessons/javascript-redux-generating-containers-with-connect-from-react-redux-addtodo
In the previous lesson we used the connect function from ReactRedux bindings library to generate the Container Component that renders a Presentational Component. I specify how to calculate the props to "inject" from the current Redux store state and the callback props to inject from the dispatch function on the Redux store.
Normally I would keep these functions called mapStateToProps and mapDispatchToProps, but I'm working in a single file right now and I need to write these functions for a few other Container Components so I'm going to re-name them to something more specific:
mapStateToPropsbecomesmapStateToTodoListPropsmapDispatchToPropsbecomesmapDispatchToTodoListProps
Which you don't have to do in your code, if you keep each Component in its own file (which is considered to be a best practise).
I will also remove the line-breaks here to make it clear that these functions are only relevant for generating this particular Container Component.
Final Code (after re-naming):
Now I'm scrolling up to the AddTodo Component which is not clearly a Container or a Presentational Component. However it uses the store, it reads the store from the context to dispatch an action when the <button> is clicked and it has to declare the contextTypes to be able to grab the store from the context. [React] Context is a an unstable API so it's best to avoid using it in application code.
Instead of reading the store from the context, I will read the dispatch function from the props, because I only need the dispatch here. I don't need the whole store, and I will create a Container Component with connect that will inject the dispatch function as a prop. I will remove the contextTypes [from the AddTodo Component] because the Component generated by connect function will take care of reading the store from the context.
Because I changed the AddTodo declaration from the const to the let binding, I can re-assign it now, so that the consuming Component does not need to specify the dispatch prop because it will be injected by the Component generated by the connect call. The first argument to the connect function is mapStateToProps, but there aren't any props for AddTodo Component that depend on the current state, so I return an empty Object. The second argument to connect is mapDispatchToProps, but AddTodo Component doesn't need any callback props. It just accepts the dispatch function itself, so I'm returning it as a prop with the same name. Finally I'm calling the function for a second time to specify the Component I want to wrap, in this case AddTodo itself:
AddTodo with the re-assignment as a call to connect:
The generated Container Component will not pass any props dependent on the state, but it will pass dispatch itself as a function so that the Component can read it from the props and use it without worrying about context or specifying contextTypes. However it is wasteful to even subscribe to the store if we don't calculate any props from its state, so I'm replacing the mapStateToProps function with a null, which tells connect that there is no need to subscribe to the store. Additionally its a pretty common pattern to inject just the dispatch function, so this is why if you specify null or any "falsy" value in connect as the second argument you're going to get dispatch injected as a prop.
So in fact I can just remove all arguments here and the default behavior will be to not subscribe to the store and to inject just the dispatch function as a prop.
03:44 - Let's re-cap what happens to the Components here: The AddTodo Component that I declare accepts dispatch as a prop, but it doesn't know how to get the store. It just "hopes" that "someone" is going to pass dispatch to it. The connect call without any arguments is going to generate a Container Component that does not subscribe to the store. However that will pass dispatch to the Component that it wraps and in this case it wraps my AddTodo Component
The second connect call returns the generated Container Component and I'm assigning it to AddTodo, so I'm re-assigning the let binding the second time, and when the further code references AddTodo it's going to reference the Container Component that does not need the dispatch prop and that will pass the dispatch prop to my inner AddTodo Component that I don't have a reference to anymore.
If you did not fully understand why Dan did this re-factoring, read the docs: https://redux.js.org/tutorials/fundamentals/part-5-ui-react
Complete code for the end of Video 28:
index.html
\
29. Generating Containers with connect() from React Redux (FooterLink)
Video: https://egghead.io/lessons/javascript-redux-generating-containers-with-connect-from-react-redux-footerlink
Finally let's take a look at the FilterLink Container Component that renders a Link with an active property and a click handler. First I will write the mapStateToProps function which I will call mapStateToLinkProp because I have everything in a single file. And it's going to accept the state of the Redux store and return the props that should be passed to the Link and we only have a single such prop called active that determines whether the link displays the current visiblityFilter. When I paste this expression from the render method I see that it references the filter prop of the FilterLink Component. To tell whether a link is active we need to compare this prop with with the visibilityFilter from the Redux store state it is fairly common to use the Container props when calculating the Child props so this is why props are passed as a second argument to mapStateToProps [or in this example mapStateToLinkProps] I will re-name it [the mapStateToLinkProps second argument] to ownProps to make it clear that we are talking about the Container Component's own props and not the props that are passed to the Child which is the return value of mapStateToLinkProps
The second function I'm writing here is mapDispatchToProps or to avoid name clashes in the JSBin [single file app] mapDispatchToLinkProps. The only argument so far is the dispatch function and I'm going to need to look at the Container Component I wrote by hand to see what props depend on the dispatch function. In this case this is just the onClick handler where I dispatch the SET_VISIBILITY_FILTER action. the only prop I'm passing down is called onClick and I declare it as an ES6 Arrow Function with no arguments and I paste the dispatch call.
But it references the props again, so I need to add ownProps as an argument the second argument to mapDispatchToLinkProps function thus:
Finally I will call the connect function from ReactRedux Library to generate the FilterLink Container Component I pass the relevant mapStateToProps function as the first argument [in our case mapStateToLinkProps] the mapDispatchToProps as the second argument [or mapDispatchToLinkProps in our case] and I call the function again with the Link Component which should be rendered:
Now I can remove the "old" FilterLink implementation.
Let's re-cap the data flow in this example: the Footer Component renders 3 FilterLink and each of them has a different filter prop that specifies which filter it corresponds to this prop will be available on the ownProps Object that both mapDispatchToProps and mapStateToProps will receive as the second argument. we pass these two functions to the connect call which will return a Container Component called FilterLink. The FilterLink will take the props that we return from the mapDispatchToProps and mapStateToProps [or the "Link" versions of these in our case...] and pass them as props the Link Component that it wraps we can now use the FilterLink Container Component and specify just the filter but the underlying Link Component will receive the calculated active and onClick values.
Complete Code at the end of Video 29:
index.html
\
30. Extracting Action Creators
Video: https://egghead.io/lessons/javascript-redux-extracting-action-creators
So far we have covered the Container Components the Presentational Components, the Reducers and the store, but we have not covered the concept of action Creators which you might see in the Redux talks and examples.
Let's consider the following example: I dispatch the ADD_TODO action from inside the <button> onClick handler and this is "fine", however it references the nextTodoId variable which I declare along side the AddTodo Component normally it would be local however what if another component wants to dispatch the ADD_TODO action ? It would need to have access to the nextTodoId somehow and while I could make this variable GLOBAL it's not a very good idea ... instead it would be best if the Components dispatching the ADD_TODO action did not have to worry about specifying the id because the only information they really pass is the text of the todo being added I don't want to generate the id inside the reducer because that would make it non-deterministic however I can extract this code generating the action Object into a function I will call addTodo I pass the input.value to addTodo and addTodo is just a function that takes the text of the todo and constructs an action Object representing ADD_TODO action. So it has the type: 'ADD_TODO', it takes care of generating the id and it includes the text.
Although extracting such function is not required it is a very common pattern in Redux applications to keep them maintainable so we call these functions action Creators and we usually place them separately from Components or from Reducers.
I will now extract other action Creators from the Components and I see that I have a SET_VISIBILITY_FILTER in a dispatch here [in the mapDispatchToLinkProps method] so I will change this to call the setVisiblityFilter action Creator with the ownProps.filter as the argument and it's going to return the action that needs to be dispatched so I'm declaring the setVisibilityFilter function this is what I call an action Creator because it takes the arguments about the action and it returns the action Object with the type: 'SET_VISIBILITY_FILTER' and the filter itself.
You might think that this kind of code is "boiler plate" and you would rather dispatch the action in-line inside the Component however don't underestimate how action Creators document your software because they tell your team what kinds of actions the Components can dispatch and this kind of information can be invaluable in large applications.
I will now scroll down to the last place where I call dispatch with an in-line action Object [the mapDispatchToTodoListProps function] and I will extract that to add toggleTodo action Creator to which I pass the id of the todo as the argument.
I'm now scrolling up to my action Creators and I will add a new one that I call toggleTodo it accepts the id as the argument and it returns the action with the type: 'TOGGLE_TODO' and this id:
Lets take a moment to consider how convenient it is to have all the action Creators in a single place so that I can use them from Components and Tests without worrying about the actions internal structure.
Note that whether you use action Creators or not the data flow is exactly the same because I just called the action Creator to get the action Object and then I call dispatch just like I did before passing the action.
Last updated