> For the complete documentation index, see [llms.txt](https://bryan-guner.gitbook.io/my-docs/llms.txt). Markdown versions of documentation pages are available by appending `.md` to page URLs; this page is available as [Markdown](https://bryan-guner.gitbook.io/my-docs/web_dev_tools/postman/creating-an-api.md).
# Creating an API
## Creating an API
To start using the API Builder, you can create a new API in your workspace. You can also rename or delete existing APIs.
### Creating an API
1. Open **APIs** from the left sidebar in Postman. You can open and edit any existing APIs from here.
2. Select **New**, then select **API** or select **+**.
> You must be signed in to your Postman account to take this action.
3. Enter a name and a version, then select a schema type and format for your API. You can optionally select the **Import** tab to import an API specification directly from either a local file or a GitHub or Bitbucket repo. If you don't import a schema, Postman will populate your API with a sample specification you can edit at any time.
> Postman currently supports OpenAPI (versions 1.0, 2.0, and 3.0), RAML (0.8 and 1.0), GraphQL, or WSDL (1.1 and 2.0) schemas. OpenAPI schemas can be defined in JSON or YAML. RAML schemas must be YAML. GraphQL schemas can be JSON or GraphQL SDL. WSDL schemas must be XML. Multi-file variants of schemas are currently not supported.
 4. Select **Create API**.

### Renaming and deleting APIs
You can rename, delete, or remove the API from the workspace using the **View more actions** () menu in the left sidebar.
> When you delete an API or remove it from a workspace, the collections, monitors, mocks, and environments linked to it will not be deleted or removed.

## Authorizing requests
APIs use authorization to ensure that client requests access data securely. This can involve authenticating the sender of a request and verifying that they have permission to access or manipulate the relevant data. If you're building an API, you can choose from a variety of auth models. If you're integrating a third-party API, the required authorization will be specified by the API provider.
You can pass auth details along with any request you send in Postman. Auth data can be included in the header, body, or as parameters to a request. If you enter your auth details in the **Authorization** tab, Postman will automatically populate the relevant parts of the request for your chosen auth type. You can use variables and collections to define authorization details more safely and efficiently, letting you reuse the same information in multiple places.
### Contents
* [Specifying authorization details](https://learning.postman.com/docs/sending-requests/authorization/#specifying-authorization-details)
* [Inheriting auth](https://learning.postman.com/docs/sending-requests/authorization/#inheriting-auth)
* [No auth](https://learning.postman.com/docs/sending-requests/authorization/#no-auth)
* [API key](https://learning.postman.com/docs/sending-requests/authorization/#api-key)
* [Bearer token](https://learning.postman.com/docs/sending-requests/authorization/#bearer-token)
* [Basic auth](https://learning.postman.com/docs/sending-requests/authorization/#basic-auth)
* [Digest auth](https://learning.postman.com/docs/sending-requests/authorization/#digest-auth)
* [OAuth 1.0](https://learning.postman.com/docs/sending-requests/authorization/#oauth-10)
* [OAuth 2.0](https://learning.postman.com/docs/sending-requests/authorization/#oauth-20)
* [Authorization code](https://learning.postman.com/docs/sending-requests/authorization/#authorization-code)
* [Authorization code (With PKCE)](https://learning.postman.com/docs/sending-requests/authorization/#authorization-code)
* [Implicit](https://learning.postman.com/docs/sending-requests/authorization/#implicit)
* [Password credentials](https://learning.postman.com/docs/sending-requests/authorization/#password-credentials)
* [Client credentials](https://learning.postman.com/docs/sending-requests/authorization/#client-credentials)
* [Requesting an OAuth 2.0 token](https://learning.postman.com/docs/sending-requests/authorization/#requesting-an-oauth-20-token)
* [Configuration Options tab](https://learning.postman.com/docs/sending-requests/authorization/#configuration-options-tab)
* [Advanced Options tab](https://learning.postman.com/docs/sending-requests/authorization/#advanced-options-tab)
* [Hawk authentication](https://learning.postman.com/docs/sending-requests/authorization/#hawk-authentication)
* [AWS Signature](https://learning.postman.com/docs/sending-requests/authorization/#aws-signature)
* [NTLM authentication](https://learning.postman.com/docs/sending-requests/authorization/#ntlm-authentication)
* [Akamai EdgeGrid](https://learning.postman.com/docs/sending-requests/authorization/#akamai-edgegrid)
* [Syncing cookies](https://learning.postman.com/docs/sending-requests/authorization/#syncing-cookies)
* [Next steps](https://learning.postman.com/docs/sending-requests/authorization/#next-steps)
### Specifying authorization details
With a request open in Postman, use the **Authorization** tab **Type** dropdown to select an auth type. Postman will prompt you to complete the relevant details for your selected type. The correct data values will be determined by your API at the server side—if you're using a third party API you will need to refer to the provider for any required auth details.

> You can use these auth types with Newman and monitors as well as in the Postman app.
When you select a type, Postman will indicate which parts of the request your details will be included in, for example the header, body, URL, or query parameters. Postman will add your auth details to the relevant parts of the request as soon as you select or enter them, so you can see how your data will be sent before attempting to run the request.

Your auth data will appear in the relevant parts of the request, for example in the **Headers** tab. To show headers added automatically, click the **hidden** button.

Hover over a header to see where it was added. To change an auth header, navigate back to the **Authorization** tab and update your configuration.
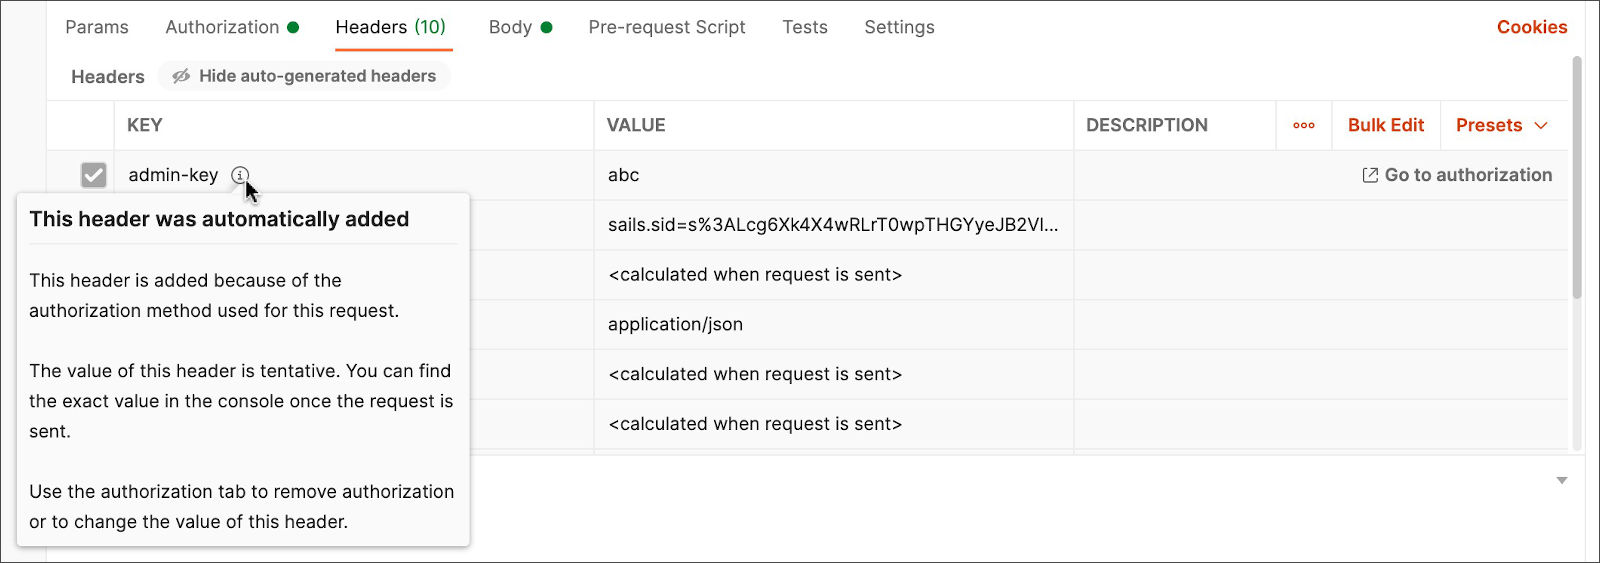
> You cannot override headers added by your **Authorization** selections directly in the **Headers** tab. If you need different auth headers from those auto-generated by Postman, alter your setup in **Authorization**, or remove your auth setup and add headers manually.
Your request auth can use environment, collection, and global [variables](https://learning.postman.com/docs/sending-requests/variables/). Postman does not save header data or query parameters to avoid exposing sensitive data such as API keys.
> You can inspect a raw dump of the entire request including auth data in the Postman console after you send it.
### Inheriting auth
If you group your requests in [collections](https://learning.postman.com/docs/sending-requests/intro-to-collections/) and folders, you can specify auth details to reuse throughout a group.
Select a collection or folder in **Collections** on the left of Postman. The collection or folder overview will open in a tab for editing. Select the **Authorization** tab.
By default, requests inside the collection or folder will inherit auth from the parent, which means that they'll use the same auth that you've specified at the folder or collection level. To change this for an individual request, make a different selection in the request **Authorization** tab.

You can choose an authorization type upfront using the same technique when you first create a collection or folder.
### No auth
Postman will not attempt to send authorization details with a request unless you specify an auth type. If your request does not require authorization, select **No Auth** from the **Authorization** tab **Type** dropdown list.
### API key
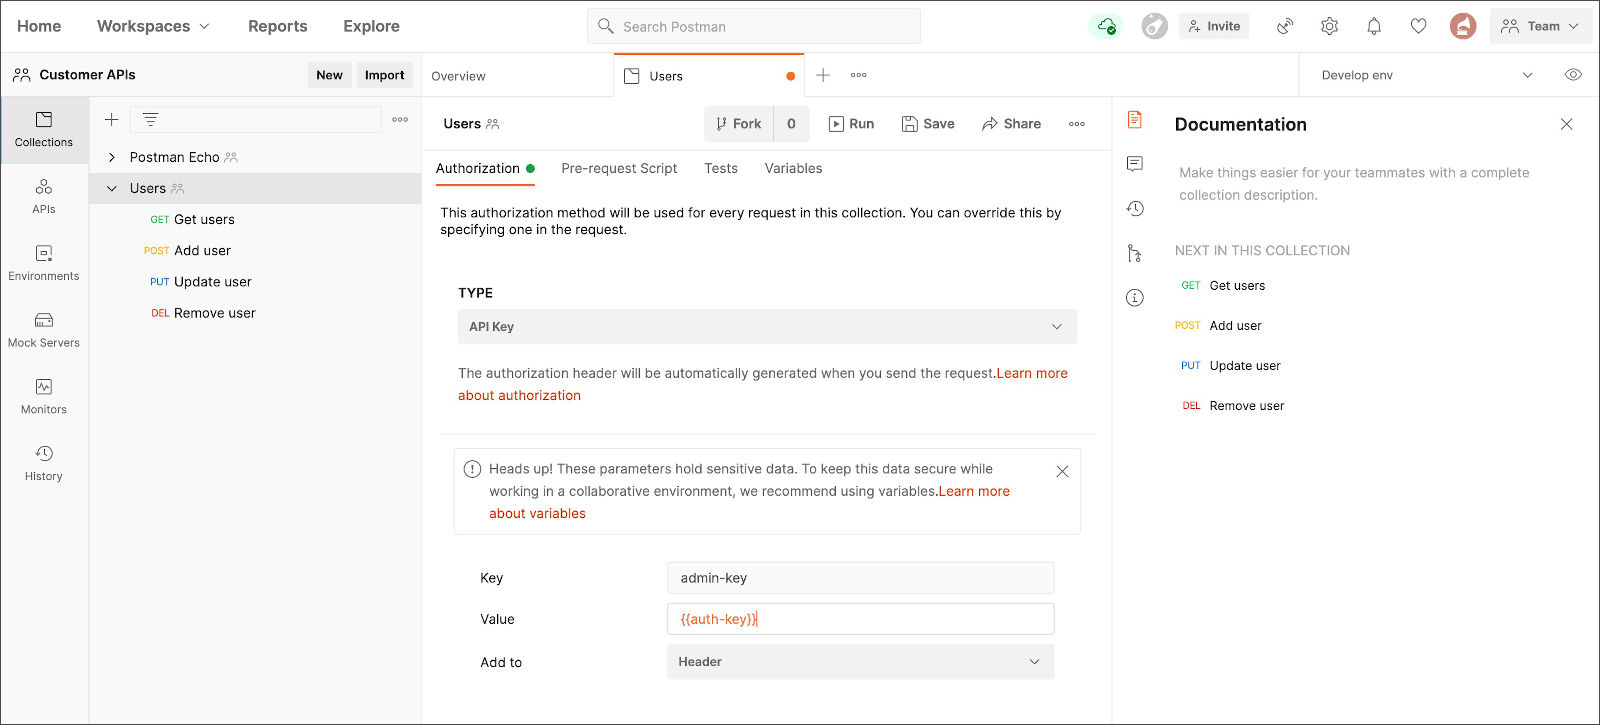
With API key auth, you send a key-value pair to the API either in the request headers or query parameters. In the request **Authorization** tab, select **API Key** from the **Type** list. Enter your key name and value, and select either **Header** or **Query Params** from the **Add to** dropdown. You can store your values in variables for additional security.
[](https://assets.postman.com/postman-docs/api-key-auth-selection.jpg)
Postman will append the relevant information to your request **Headers** or the URL query string.
### Bearer token
Bearer tokens allow requests to authenticate using an access key, such as a JSON Web Token (JWT). The token is a text string, included in the request header. In the request **Authorization** tab, select **Bearer Token** from the **Type** dropdown list. In the **Token** field, enter your API key value—or for added security, store it in a variable and reference the variable by name.
Postman will append the token value to the text "Bearer " in the required format to the request Authorization header as follows:
```
Bearer
```
> If a custom prefix is needed, use an [API Key](https://learning.postman.com/docs/sending-requests/authorization/#api-key) with a key of **Authorization**.

### Basic auth
Basic authentication involves sending a verified username and password with your request. In the request **Authorization** tab, select **Basic Auth** from the **Type** dropdown list.

Enter your API login details in the **Username** and **Password** fields—for additional security you can store these in variables.
In the request **Headers**, you will see that the Authorization header is going to pass the API a Base64 encoded string representing your username and password values, appended to the text "Basic " as follows:
```
Basic
```

### Digest auth
With Digest auth, the client sends a first request to the API, and the server responds with a few details, including a number that can be used only once (nonce), a realm value, and a `401` unauthorized response. You then send back an encrypted array of data including username and password combined with the data received from the server in the first request. The server uses the passed data to generate an encrypted string and compares it against what you sent in order to authenticate your request.
In the **Authorization** tab for a request, select **Digest Auth** from the **Type** dropdown list. Postman will present fields for both stages of authentication request—however it will autocomplete the fields for the second request using data returned from the server by the first request. To allow Postman to automate the flow, enter **Username** and **Password** values (or variables) and these will be sent with the second request.

> If you don't want Postman to automatically extract the data, check the box to disable retrying the request. If you do this, you will need to complete the advanced fields and run each request manually.
The advanced fields are optional, and Postman will attempt to populate them automatically when your request runs.
* **Realm:** A string specified by the server in the `WWW-Authenticate` response header.
* **Nonce:** A unique string specified by the server in the `WWW-Authenticate` response header.
* **Algorithm:** A string that indicates a pair of algorithms used to produce the digest and a checksum. Postman supports `MD5` and `SHA` algorithms.
* **qop:** The quality of protection applied to the message. The value must be one of the alternatives specified by the server in the `WWW-Authenticate` response header.
* **Nonce Count:** The hexadecimal count of the number of requests (including the current request) that the client has sent with the nonce value in this request.
* **Client Nonce:** An opaque quoted string value provided by the client, used by both client and server to avoid chosen plaintext attacks, to provide mutual authentication, and to provide some message integrity protection.
* **Opaque:** A string of data specified by the server in the `WWW-Authenticate` response header, which should be used unchanged with URIs in the same protection space.
### OAuth 1.0
OAuth 1.0 allows client applications to access data provided by a third-party API. For example, as a user of a service you can grant another application access to your data with that service without exposing your login details. Accessing user data via the OAuth 1.0 flow involves a few requests back and forth between client application, user, and service provider.
OAuth 1.0 is sometimes referred to as "two-legged" (auth only between client and server) or "three-legged" (where a client requests data for a user of a third-party service). An example OAuth 1.0 flow could run as follows:
* To request user data with a third-party service, a consumer (client application) requests an access token using credentials such as a key and secret.
* The service provider issues an initial token (that doesn't provide access to user data) and the consumer requests authorization from the user.
* When the user grants auth, the consumer makes a request to exchange the temporary token for an access token, passing verification from the user auth.
* The service provider returns the access token and the consumer can then make requests to the service provider to access the user's data.
> Postman supports [OAuth Core 1.0 Revision A](https://oauth.net/core/1.0a/).
In the **Authorization** tab for a request, select **OAuth 1.0** from the **Type** dropdown list.

Select a **Signature Method** from the drop-down list—this will determine which parameters you should include with your request. Postman supports `HMAC-SHA1`, `HMAC-SHA256`, `HMAC-SHA512`, `RSA-SHA1`, `RSA-SHA256`, `RSA-SHA512`, and `PLAINTEXT`.

* If your server requires an `HMAC` or `PLAINTEXT` signature, Postman will provide **Consumer Key**, **Consumer Secret**, **Access Token**, and **Token Secret** fields.
* If you're using an `RSA` signature, Postman will present **Consumer Key**, **Access Token**, and **Private Key** inputs.
You can optionally set advanced details—otherwise Postman will attempt to autocomplete these.
You can include the auth details either in the request headers or in the body / URL—select one from the dropdown list. Open the **Headers** or **Body** tab if you want to check how the details will be included with the request.
If you send the OAuth 1.0 data in the headers, you will see an Authorization header sending your key and secret values appended to the string " OAuth " together with additional comma-separated required details.
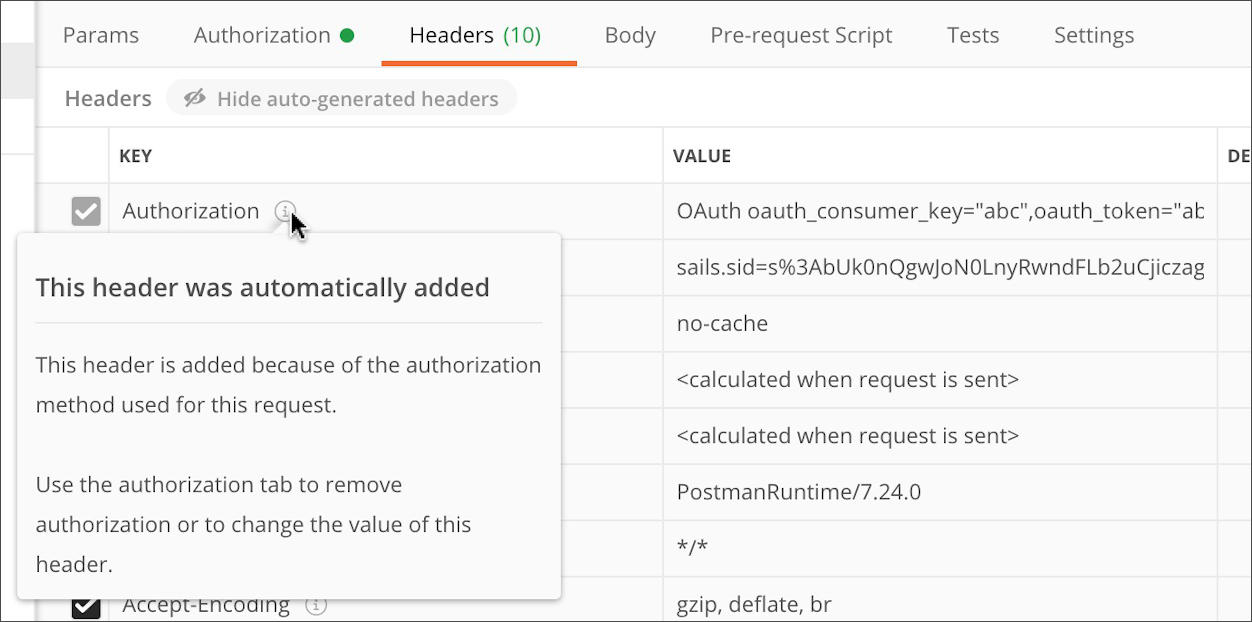
> Postman will append the OAuth 1.0 information to the request **Headers** when you have completed all required fields in your **Authorization** setup.
If you send the OAuth 1.0 data in the body and URL, you will find the data added either in the request **Body** or **Parameters** depending on the request method.

If the request method is `POST` or `PUT`, and if the request body type is `x-www-form-urlencoded`, Postman will add the authorization parameters to the request body. Otherwise, for example in a `GET` request, your key and secret data will be passed in the URL query parameters.
The OAuth 1.0 auth parameter values are as follows:
* **Signature Method**: The method your API uses to authenticate requests.
* **Consumer Key:** A value used to identify a consumer with the service provider.
* **Consumer Secret:** A value used by the consumer to establish ownership of the key. *For `HMAC` and `PLAINTEXT` signing methods.*
* **Access Token:** A value representing the consumer's permission to access the user's data.
* **Token Secret:** A value used by the consumer to establish ownership of a given token. *For `HMAC` and `PLAINTEXT` signing methods.*
* **Private Key:** A private key to generate the auth signature. *For `RSA` signing methods.*
* Advanced Parameters:
* **Callback URL:** URL service provider will redirect to following user authorization. *Required if your server uses OAuth 1.0 Revision A.*
* **Verifier:** Verification code from service provider after user auth.
* **Time Stamp:** The timestamp the server uses to prevent replay attacks outside the time window.
* **Nonce:** A random string generated by the client.
* **Version:** The version of the OAuth authentication protocol (1.0).
* **Realm:** A string specified by the server in the `WWW-Authenticate` response header.
* **Include body hash:** Hash for integrity check with request bodies *other than* `application/x-www-form-urlencoded`. *Disabled when you're using callback URL / verifier.*
> If your server implementation of OAuth 1.0 requires it, check **Add empty parameters to signature**.
>
> You can also check the box to **Encode the parameters in the authorization header** for your request.
### OAuth 2.0
OAuth 1.0 allows client applications to access data provided by a third-party API. For example, as a user of a service you can grant another application access to your data with that service without exposing your login details. With OAuth 2.0, you first retrieve an access token for the API, then use that token to authenticate future requests. Accessing data via the OAuth 2.0 flow varies greatly between API service providers, but typically involves a few requests back and forth between client application, user, and API.
An example OAuth 2.0 flow could run as follows:
* A client application makes a request for the user to authorize access to their data.
* If the user grants access, the application then requests an access token from the service provider, passing the access grant from the user and authentication details to identify the client.
* The service provider validates these details and returns an access token.
* The client uses the access token to request the user data via the service provider.
In the **Authorization** tab for a request, select **OAuth 2.0** from the **Type** dropdown list. Specify whether you want pass the auth details in the request URL or headers.
> By default Postman will append the access token to `Bearer` in the Authorization header for your request, but if your server implementation requires a different prefix, you can specify it in the **Header Prefix** field.
To request an access token, fill out the fields in the **Configure New Token** section, and click **Get New Access Token**. You can save both the token and the details to generate a token with your request or collection.
[](https://assets.postman.com/postman-docs/oauth2.v8-2.jpg)
> Once you have a token value generated and added, it will appear in the request **Headers**.
Enter the details for your client application, and any auth details from the service provider. This allows you to replicate your application auth flow inside Postman in order to test authenticated requests.
> You can share token credentials with your team by clicking the sync button next to an available token. By default Postman will not sync your token in case you do not want to share it.
Postman will prompt you to supply specific details depending on the OAuth 2.0 **grant** type, which can be [Authorization code](https://learning.postman.com/docs/sending-requests/authorization/#authorization-code), [Implicit](https://learning.postman.com/docs/sending-requests/authorization/#implicit), [Password credentials](https://learning.postman.com/docs/sending-requests/authorization/#password-credentials), or [Client credentials](https://learning.postman.com/docs/sending-requests/authorization/#client-credentials).
#### Authorization code
Authorization code grant type requires the user to authenticate with the provider—an authorization code is then sent back to the client app, extracted, and exchanged with the provider for an access token to authenticate subsequent requests.
To use authorization code grant type, enter a **Callback URL** for your client application (which should be registered with the API provider), together with various details provided by the API service including **Auth URL**, **Access Token URL**, **Client ID**, and **Client Secret**.
> You can enter your auth details in the web browser, instead of in Postman, if you prefer, by selecting **Authorize using browser**.
**Authorization code (With PKCE)**
You can use PKCE (Proof Key for Code Exchange) with OAuth 2.0. When you select **Authorization Code (With PKCE)** two additional fields will become available for **Code Challenge Method** and **Code Verifier**. You can opt to use `SHA-256` or `Plain` algorithms to generate the code challenge. The verifier is an optional 43-128 character string to connect the authorization request to the token request.
> **Authorization code (With PKCE)** grant type coupled with **Authorize using browser** is recommended to prevent auth code interception attacks.
#### Implicit
Implicit grant type returns an access token to the client straight away without requiring the additional auth code step (and is therefore less secure).
To use implicit grant type with your requests in Postman, enter a **Callback URL** you have registered with the API provider, the provider **Auth URL**, and a **Client ID** for the app you have registered.
> You can enter your auth details in the web browser, instead of in Postman, if you prefer, by selecting **Authorize using browser**.
#### Password credentials
OAuth 2.0 Password grant type involves sending username and password directly from the client and is therefore not recommended if you're dealing with third-party data.
To use password grant type, enter your API provider's **Access Token URL**, together with the **Username** and **Password**. In some cases you will also need to provide a client ID and secret.
#### Client credentials
Client credentials grant type is typically not used to access user data but instead for data associated with the client application.
Enter the provider's **Access Token URL**, together with the **Client ID** and **Client Secret** for your registered application.
#### Requesting an OAuth 2.0 token
The full list of parameters to request a new access token is as follows, depending on your grant type.
**Configuration Options tab**
* **Token Name:** The name you want to use for the token.
* **Grant Type:** A dropdown list of options. This will depend on the API service provider requirements.
* **Callback URL:** The client application callback URL redirected to after auth, and that should be registered with the API provider. If not provided, Postman will use a default empty URL and attempt to extract the code or access token from it. If this does not work for your API, you can use the following URL: `https://oauth.pstmn.io/v1/browser-callback`
* **Authorize using browser:** You can enter your credentials in your web browser, instead of the pop-up that appears in Postman by default when you use the **Authorization code** or **Implicit** grant type. Checking this box will set the **Callback URL** to return to Postman. If you opt to authorize using the browser, make sure pop-ups are disabled for the callback URL, otherwise it will not work.
* **Auth URL:** The endpoint for the API provider authorization server, to retrieve the auth code.
* **Access Token URL:** The provider's authentication server, to exchange an authorization code for an access token.
* **Client ID:** The ID for your client application registered with the API provider.
* **Client Secret:** The client secret given to you by the API provider.
* **Scope:** The scope of access you are requesting, which may include multiple space-separated values.
* **State:** An opaque value to prevent cross-site request forgery.
* **Client Authentication:** A dropdown—send a Basic Auth request in the header, or client credentials in the request body. *After upgrading to a new version, change the value in this dropdown menu to avoid problems with client authentication.*
**Advanced Options tab**
* **Resource:** A URI that indicates the resource or target service where the token is intended to be used.
* **Audience:** A URI that indicates the target audience or service where the token is intended to be used.
When your config is complete, click **Get New Access Token**.
> When you use **Authorization code** or **Implicit** grant type, you will be prompted to supply your credentials to retrieve an access token to use in subsequent requests. By default Postman will display a pop-up browser when you click **Request Token**. You can alternatively choose to authenticate using your system's default web browser. Select **Authorize using browser** and the **Callback URL** will autofill to return to Postman when you have completed auth in the browser, so that your requests can use the token returned on successful authentication.
If you successfully receive a token from the API, you will see its details, together with the expiry, and optionally a refresh token you can use to retrieve a new access token when your current one expires. Click **Use Token** to select the returned value.
Any successfully retrieved tokens will be listed in the request **Available Tokens** dropdown list. Select one to send with your request. Select **Manage Tokens** in the dropdown list to view more details or delete your tokens.
If authentication fails or times out, Postman will display an error message. You can check the error details in the console, **Retry** to attempt authentication again, or edit your auth details before continuing.
> Deleting a token in Postman does not revoke access. Only the server that issues the token can revoke it.
### Hawk authentication
Hawk authentication enables you to authorize requests using partial cryptographic verification.
In the **Authorization** tab for a request, select **Hawk Authentication** from the **Type** dropdown list.

Enter your details in the **Hawk Auth ID**, **Hawk Auth Key**, and **Algorithm** fields. You can optionally set advanced details, but Postman will attempt to generate values for them if necessary.
> When the required details are complete in the **Authorization** tab for your request, Postman will add them to the **Headers**.
The Hawk Authentication parameters are as follows:
* **Hawk Auth ID:** Your API authentication ID value.
* **Hawk Auth Key:** Your API authentication key value.
* **Algorithm:** The hash algorithm used to create the message authentication code (MAC).
* Advanced parameters:
* **User:** The username.
* **Nonce:** A random string generated by the client.
* **ext:** Any application-specific information to be sent with the request.
* **app:** The binding between credentials and the application to prevent an attacker using credentials issued to someone else.
* **dlg:** The ID of the application the credentials were issued to.
* **Timestamp:** Timestamp the server uses to prevent replay attacks outside the time window.
### AWS Signature
AWS is the authorization workflow for Amazon Web Services requests. AWS uses a custom HTTP scheme based on a keyed-HMAC (Hash Message Authentication Code) for authentication.
The official AWS Signature documentation provides more detail:
* [Signing and Authenticating REST Requests](https://docs.aws.amazon.com/AmazonS3/latest/userguide/RESTAuthentication.html)
* [Use Postman to Call an API](https://docs.aws.amazon.com/apigateway/latest/developerguide/how-to-call-api.html)
In the **Authorization** tab for a request, select **AWS Signature** from the **Type** dropdown list.

Select where Postman should append your AWS auth details using the **Add authorization data to** drop-down—choosing the request headers or URL.
* If you select **Request Headers**, Postman will add `Authorization` and `X-Amz-` prefixed fields in the **Headers** tab.
* If you select **Request URL**, Postman will add the auth details in **Params** with keys prefixed `X-Amz-`.
Enter your access key and secret values either directly in the fields or via variables for additional security.
You can optionally set advanced fields, but Postman will attempt to auto-generate these if necessary.
The AWS Signature parameters are as follows:
* **AWS Region:** The region receiving the request (defaults to `us-east-1`).
* **Service Name:** The service receiving the request.
* **Session Token:** Required only when using temporary security credentials.
### NTLM authentication
Windows Challenge/Response (NTLM) is the authorization flow for the Windows operating system and for standalone systems.
In the **Authorization** tab for a request, select **NTLM Authentication** from the **Type** dropdown list.

Enter your **Username** and **Password** for NTLM access (use variables to avoid entering the values directly). You can optionally specify advanced parameters, but Postman will attempt to autocomplete these if necessary. By default your request will run a second time after extracting data received from the first—you can disable this by checking the checkbox.
Advanced parameters for NTLM auth are as follows:
* **Domain:** The domain or host to authenticate against.
* **Workstation:** The hostname of the PC.
### Akamai EdgeGrid
Akamai Edgegrid is an authorization helper developed and used by Akamai.
In the **Authorization** tab for a request, select **Akamai EdgeGrid** from the **Type** dropdown list.
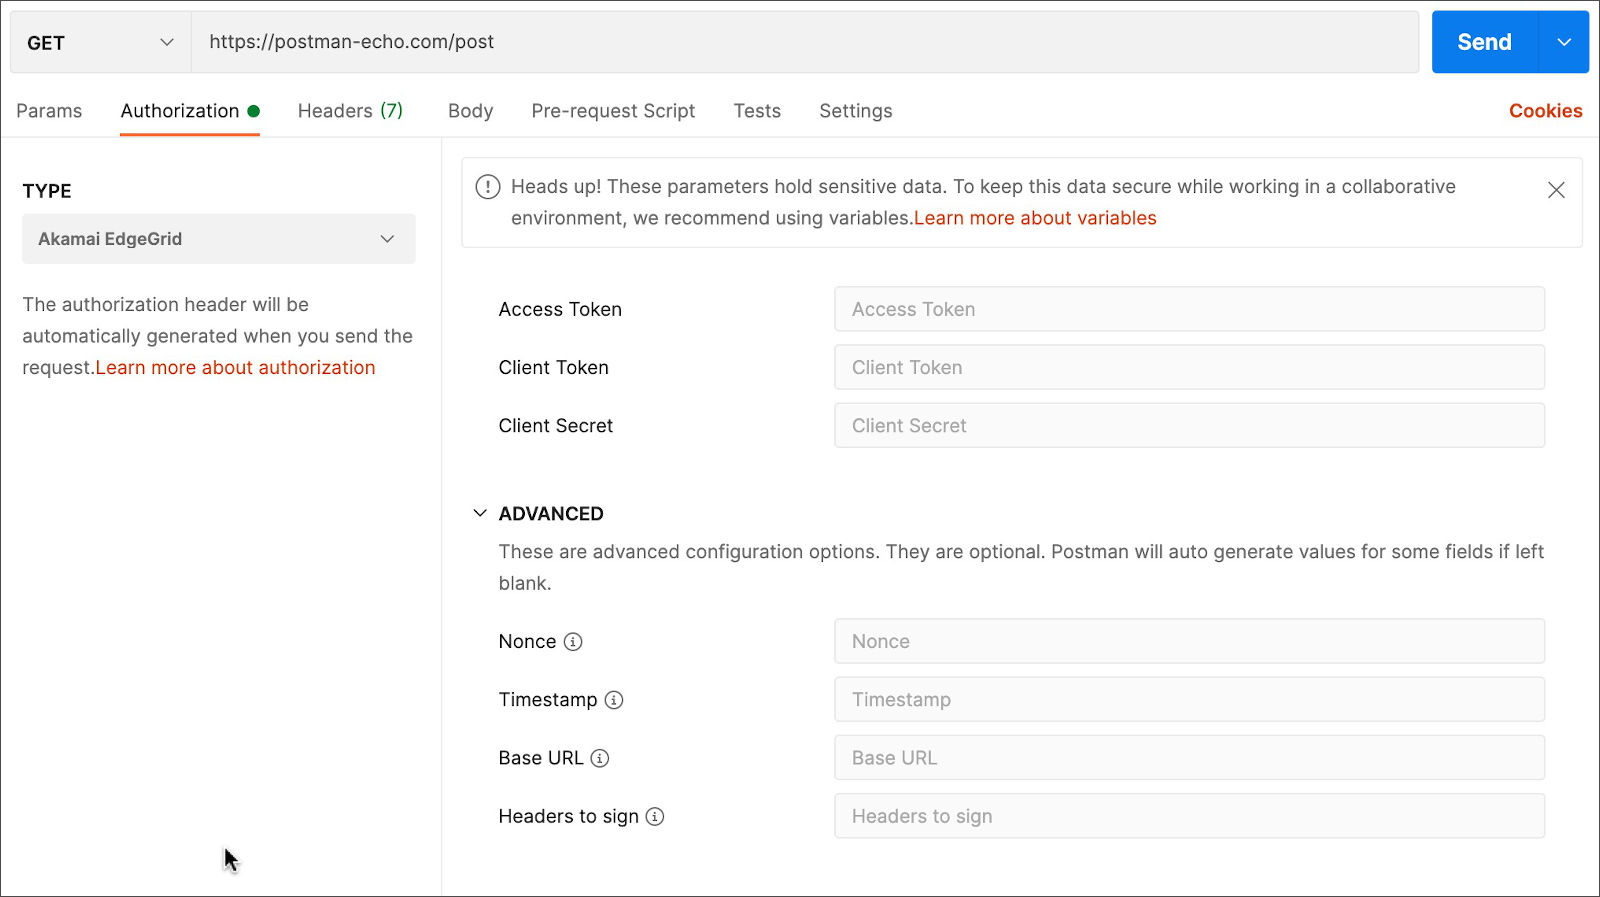
Enter your **Access Token**, **Client Token**, and **Client Secret**, using variables for additional security—you will receive these details when you register a client application with Akamai.
> When the required details are complete in the **Authorization** tab for your request, Postman will add them to the **Headers**.
For information on obtaining your credentials, see [Akamai Developer - Authorize your Client](https://developer.akamai.com/legacy/introduction/Prov_Creds.html).
### Syncing cookies
If you have session cookies in your browser, you can sync them to Postman using the Interceptor—see [Interceptor extension](https://learning.postman.com/docs/sending-requests/capturing-request-data/interceptor/) and [Cookies](https://learning.postman.com/docs/sending-requests/cookies/) for more detail.
### Next steps
If you're having issues getting a request to authenticate and run successfully, try some of the tips in [troubleshooting API requests](https://learning.postman.com/docs/sending-requests/troubleshooting-api-requests/). If you still have auth problems, check out the [authentication tag](https://community.postman.com/tags/authentication) on the Postman forum.
4. Select **Create API**.

### Renaming and deleting APIs
You can rename, delete, or remove the API from the workspace using the **View more actions** () menu in the left sidebar.
> When you delete an API or remove it from a workspace, the collections, monitors, mocks, and environments linked to it will not be deleted or removed.

## Authorizing requests
APIs use authorization to ensure that client requests access data securely. This can involve authenticating the sender of a request and verifying that they have permission to access or manipulate the relevant data. If you're building an API, you can choose from a variety of auth models. If you're integrating a third-party API, the required authorization will be specified by the API provider.
You can pass auth details along with any request you send in Postman. Auth data can be included in the header, body, or as parameters to a request. If you enter your auth details in the **Authorization** tab, Postman will automatically populate the relevant parts of the request for your chosen auth type. You can use variables and collections to define authorization details more safely and efficiently, letting you reuse the same information in multiple places.
### Contents
* [Specifying authorization details](https://learning.postman.com/docs/sending-requests/authorization/#specifying-authorization-details)
* [Inheriting auth](https://learning.postman.com/docs/sending-requests/authorization/#inheriting-auth)
* [No auth](https://learning.postman.com/docs/sending-requests/authorization/#no-auth)
* [API key](https://learning.postman.com/docs/sending-requests/authorization/#api-key)
* [Bearer token](https://learning.postman.com/docs/sending-requests/authorization/#bearer-token)
* [Basic auth](https://learning.postman.com/docs/sending-requests/authorization/#basic-auth)
* [Digest auth](https://learning.postman.com/docs/sending-requests/authorization/#digest-auth)
* [OAuth 1.0](https://learning.postman.com/docs/sending-requests/authorization/#oauth-10)
* [OAuth 2.0](https://learning.postman.com/docs/sending-requests/authorization/#oauth-20)
* [Authorization code](https://learning.postman.com/docs/sending-requests/authorization/#authorization-code)
* [Authorization code (With PKCE)](https://learning.postman.com/docs/sending-requests/authorization/#authorization-code)
* [Implicit](https://learning.postman.com/docs/sending-requests/authorization/#implicit)
* [Password credentials](https://learning.postman.com/docs/sending-requests/authorization/#password-credentials)
* [Client credentials](https://learning.postman.com/docs/sending-requests/authorization/#client-credentials)
* [Requesting an OAuth 2.0 token](https://learning.postman.com/docs/sending-requests/authorization/#requesting-an-oauth-20-token)
* [Configuration Options tab](https://learning.postman.com/docs/sending-requests/authorization/#configuration-options-tab)
* [Advanced Options tab](https://learning.postman.com/docs/sending-requests/authorization/#advanced-options-tab)
* [Hawk authentication](https://learning.postman.com/docs/sending-requests/authorization/#hawk-authentication)
* [AWS Signature](https://learning.postman.com/docs/sending-requests/authorization/#aws-signature)
* [NTLM authentication](https://learning.postman.com/docs/sending-requests/authorization/#ntlm-authentication)
* [Akamai EdgeGrid](https://learning.postman.com/docs/sending-requests/authorization/#akamai-edgegrid)
* [Syncing cookies](https://learning.postman.com/docs/sending-requests/authorization/#syncing-cookies)
* [Next steps](https://learning.postman.com/docs/sending-requests/authorization/#next-steps)
### Specifying authorization details
With a request open in Postman, use the **Authorization** tab **Type** dropdown to select an auth type. Postman will prompt you to complete the relevant details for your selected type. The correct data values will be determined by your API at the server side—if you're using a third party API you will need to refer to the provider for any required auth details.

> You can use these auth types with Newman and monitors as well as in the Postman app.
When you select a type, Postman will indicate which parts of the request your details will be included in, for example the header, body, URL, or query parameters. Postman will add your auth details to the relevant parts of the request as soon as you select or enter them, so you can see how your data will be sent before attempting to run the request.

Your auth data will appear in the relevant parts of the request, for example in the **Headers** tab. To show headers added automatically, click the **hidden** button.

Hover over a header to see where it was added. To change an auth header, navigate back to the **Authorization** tab and update your configuration.

> You cannot override headers added by your **Authorization** selections directly in the **Headers** tab. If you need different auth headers from those auto-generated by Postman, alter your setup in **Authorization**, or remove your auth setup and add headers manually.
Your request auth can use environment, collection, and global [variables](https://learning.postman.com/docs/sending-requests/variables/). Postman does not save header data or query parameters to avoid exposing sensitive data such as API keys.
> You can inspect a raw dump of the entire request including auth data in the Postman console after you send it.
### Inheriting auth
If you group your requests in [collections](https://learning.postman.com/docs/sending-requests/intro-to-collections/) and folders, you can specify auth details to reuse throughout a group.
Select a collection or folder in **Collections** on the left of Postman. The collection or folder overview will open in a tab for editing. Select the **Authorization** tab.

By default, requests inside the collection or folder will inherit auth from the parent, which means that they'll use the same auth that you've specified at the folder or collection level. To change this for an individual request, make a different selection in the request **Authorization** tab.

You can choose an authorization type upfront using the same technique when you first create a collection or folder.
### No auth
Postman will not attempt to send authorization details with a request unless you specify an auth type. If your request does not require authorization, select **No Auth** from the **Authorization** tab **Type** dropdown list.
### API key
With API key auth, you send a key-value pair to the API either in the request headers or query parameters. In the request **Authorization** tab, select **API Key** from the **Type** list. Enter your key name and value, and select either **Header** or **Query Params** from the **Add to** dropdown. You can store your values in variables for additional security.
[](https://assets.postman.com/postman-docs/api-key-auth-selection.jpg)
Postman will append the relevant information to your request **Headers** or the URL query string.
### Bearer token
Bearer tokens allow requests to authenticate using an access key, such as a JSON Web Token (JWT). The token is a text string, included in the request header. In the request **Authorization** tab, select **Bearer Token** from the **Type** dropdown list. In the **Token** field, enter your API key value—or for added security, store it in a variable and reference the variable by name.
Postman will append the token value to the text "Bearer " in the required format to the request Authorization header as follows:
```
Bearer
```
> If a custom prefix is needed, use an [API Key](https://learning.postman.com/docs/sending-requests/authorization/#api-key) with a key of **Authorization**.

### Basic auth
Basic authentication involves sending a verified username and password with your request. In the request **Authorization** tab, select **Basic Auth** from the **Type** dropdown list.

Enter your API login details in the **Username** and **Password** fields—for additional security you can store these in variables.
In the request **Headers**, you will see that the Authorization header is going to pass the API a Base64 encoded string representing your username and password values, appended to the text "Basic " as follows:
```
Basic
```

### Digest auth
With Digest auth, the client sends a first request to the API, and the server responds with a few details, including a number that can be used only once (nonce), a realm value, and a `401` unauthorized response. You then send back an encrypted array of data including username and password combined with the data received from the server in the first request. The server uses the passed data to generate an encrypted string and compares it against what you sent in order to authenticate your request.
In the **Authorization** tab for a request, select **Digest Auth** from the **Type** dropdown list. Postman will present fields for both stages of authentication request—however it will autocomplete the fields for the second request using data returned from the server by the first request. To allow Postman to automate the flow, enter **Username** and **Password** values (or variables) and these will be sent with the second request.

> If you don't want Postman to automatically extract the data, check the box to disable retrying the request. If you do this, you will need to complete the advanced fields and run each request manually.
The advanced fields are optional, and Postman will attempt to populate them automatically when your request runs.
* **Realm:** A string specified by the server in the `WWW-Authenticate` response header.
* **Nonce:** A unique string specified by the server in the `WWW-Authenticate` response header.
* **Algorithm:** A string that indicates a pair of algorithms used to produce the digest and a checksum. Postman supports `MD5` and `SHA` algorithms.
* **qop:** The quality of protection applied to the message. The value must be one of the alternatives specified by the server in the `WWW-Authenticate` response header.
* **Nonce Count:** The hexadecimal count of the number of requests (including the current request) that the client has sent with the nonce value in this request.
* **Client Nonce:** An opaque quoted string value provided by the client, used by both client and server to avoid chosen plaintext attacks, to provide mutual authentication, and to provide some message integrity protection.
* **Opaque:** A string of data specified by the server in the `WWW-Authenticate` response header, which should be used unchanged with URIs in the same protection space.
### OAuth 1.0
OAuth 1.0 allows client applications to access data provided by a third-party API. For example, as a user of a service you can grant another application access to your data with that service without exposing your login details. Accessing user data via the OAuth 1.0 flow involves a few requests back and forth between client application, user, and service provider.
OAuth 1.0 is sometimes referred to as "two-legged" (auth only between client and server) or "three-legged" (where a client requests data for a user of a third-party service). An example OAuth 1.0 flow could run as follows:
* To request user data with a third-party service, a consumer (client application) requests an access token using credentials such as a key and secret.
* The service provider issues an initial token (that doesn't provide access to user data) and the consumer requests authorization from the user.
* When the user grants auth, the consumer makes a request to exchange the temporary token for an access token, passing verification from the user auth.
* The service provider returns the access token and the consumer can then make requests to the service provider to access the user's data.
> Postman supports [OAuth Core 1.0 Revision A](https://oauth.net/core/1.0a/).
In the **Authorization** tab for a request, select **OAuth 1.0** from the **Type** dropdown list.

Select a **Signature Method** from the drop-down list—this will determine which parameters you should include with your request. Postman supports `HMAC-SHA1`, `HMAC-SHA256`, `HMAC-SHA512`, `RSA-SHA1`, `RSA-SHA256`, `RSA-SHA512`, and `PLAINTEXT`.

* If your server requires an `HMAC` or `PLAINTEXT` signature, Postman will provide **Consumer Key**, **Consumer Secret**, **Access Token**, and **Token Secret** fields.
* If you're using an `RSA` signature, Postman will present **Consumer Key**, **Access Token**, and **Private Key** inputs.
You can optionally set advanced details—otherwise Postman will attempt to autocomplete these.
You can include the auth details either in the request headers or in the body / URL—select one from the dropdown list. Open the **Headers** or **Body** tab if you want to check how the details will be included with the request.
If you send the OAuth 1.0 data in the headers, you will see an Authorization header sending your key and secret values appended to the string " OAuth " together with additional comma-separated required details.

> Postman will append the OAuth 1.0 information to the request **Headers** when you have completed all required fields in your **Authorization** setup.
If you send the OAuth 1.0 data in the body and URL, you will find the data added either in the request **Body** or **Parameters** depending on the request method.

If the request method is `POST` or `PUT`, and if the request body type is `x-www-form-urlencoded`, Postman will add the authorization parameters to the request body. Otherwise, for example in a `GET` request, your key and secret data will be passed in the URL query parameters.
The OAuth 1.0 auth parameter values are as follows:
* **Signature Method**: The method your API uses to authenticate requests.
* **Consumer Key:** A value used to identify a consumer with the service provider.
* **Consumer Secret:** A value used by the consumer to establish ownership of the key. *For `HMAC` and `PLAINTEXT` signing methods.*
* **Access Token:** A value representing the consumer's permission to access the user's data.
* **Token Secret:** A value used by the consumer to establish ownership of a given token. *For `HMAC` and `PLAINTEXT` signing methods.*
* **Private Key:** A private key to generate the auth signature. *For `RSA` signing methods.*
* Advanced Parameters:
* **Callback URL:** URL service provider will redirect to following user authorization. *Required if your server uses OAuth 1.0 Revision A.*
* **Verifier:** Verification code from service provider after user auth.
* **Time Stamp:** The timestamp the server uses to prevent replay attacks outside the time window.
* **Nonce:** A random string generated by the client.
* **Version:** The version of the OAuth authentication protocol (1.0).
* **Realm:** A string specified by the server in the `WWW-Authenticate` response header.
* **Include body hash:** Hash for integrity check with request bodies *other than* `application/x-www-form-urlencoded`. *Disabled when you're using callback URL / verifier.*
> If your server implementation of OAuth 1.0 requires it, check **Add empty parameters to signature**.
>
> You can also check the box to **Encode the parameters in the authorization header** for your request.
### OAuth 2.0
OAuth 1.0 allows client applications to access data provided by a third-party API. For example, as a user of a service you can grant another application access to your data with that service without exposing your login details. With OAuth 2.0, you first retrieve an access token for the API, then use that token to authenticate future requests. Accessing data via the OAuth 2.0 flow varies greatly between API service providers, but typically involves a few requests back and forth between client application, user, and API.
An example OAuth 2.0 flow could run as follows:
* A client application makes a request for the user to authorize access to their data.
* If the user grants access, the application then requests an access token from the service provider, passing the access grant from the user and authentication details to identify the client.
* The service provider validates these details and returns an access token.
* The client uses the access token to request the user data via the service provider.
In the **Authorization** tab for a request, select **OAuth 2.0** from the **Type** dropdown list. Specify whether you want pass the auth details in the request URL or headers.
> By default Postman will append the access token to `Bearer` in the Authorization header for your request, but if your server implementation requires a different prefix, you can specify it in the **Header Prefix** field.
To request an access token, fill out the fields in the **Configure New Token** section, and click **Get New Access Token**. You can save both the token and the details to generate a token with your request or collection.
[](https://assets.postman.com/postman-docs/oauth2.v8-2.jpg)
> Once you have a token value generated and added, it will appear in the request **Headers**.
Enter the details for your client application, and any auth details from the service provider. This allows you to replicate your application auth flow inside Postman in order to test authenticated requests.
> You can share token credentials with your team by clicking the sync button next to an available token. By default Postman will not sync your token in case you do not want to share it.
Postman will prompt you to supply specific details depending on the OAuth 2.0 **grant** type, which can be [Authorization code](https://learning.postman.com/docs/sending-requests/authorization/#authorization-code), [Implicit](https://learning.postman.com/docs/sending-requests/authorization/#implicit), [Password credentials](https://learning.postman.com/docs/sending-requests/authorization/#password-credentials), or [Client credentials](https://learning.postman.com/docs/sending-requests/authorization/#client-credentials).
#### Authorization code
Authorization code grant type requires the user to authenticate with the provider—an authorization code is then sent back to the client app, extracted, and exchanged with the provider for an access token to authenticate subsequent requests.
To use authorization code grant type, enter a **Callback URL** for your client application (which should be registered with the API provider), together with various details provided by the API service including **Auth URL**, **Access Token URL**, **Client ID**, and **Client Secret**.
> You can enter your auth details in the web browser, instead of in Postman, if you prefer, by selecting **Authorize using browser**.
**Authorization code (With PKCE)**
You can use PKCE (Proof Key for Code Exchange) with OAuth 2.0. When you select **Authorization Code (With PKCE)** two additional fields will become available for **Code Challenge Method** and **Code Verifier**. You can opt to use `SHA-256` or `Plain` algorithms to generate the code challenge. The verifier is an optional 43-128 character string to connect the authorization request to the token request.
> **Authorization code (With PKCE)** grant type coupled with **Authorize using browser** is recommended to prevent auth code interception attacks.
#### Implicit
Implicit grant type returns an access token to the client straight away without requiring the additional auth code step (and is therefore less secure).
To use implicit grant type with your requests in Postman, enter a **Callback URL** you have registered with the API provider, the provider **Auth URL**, and a **Client ID** for the app you have registered.
> You can enter your auth details in the web browser, instead of in Postman, if you prefer, by selecting **Authorize using browser**.
#### Password credentials
OAuth 2.0 Password grant type involves sending username and password directly from the client and is therefore not recommended if you're dealing with third-party data.
To use password grant type, enter your API provider's **Access Token URL**, together with the **Username** and **Password**. In some cases you will also need to provide a client ID and secret.
#### Client credentials
Client credentials grant type is typically not used to access user data but instead for data associated with the client application.
Enter the provider's **Access Token URL**, together with the **Client ID** and **Client Secret** for your registered application.
#### Requesting an OAuth 2.0 token
The full list of parameters to request a new access token is as follows, depending on your grant type.
**Configuration Options tab**
* **Token Name:** The name you want to use for the token.
* **Grant Type:** A dropdown list of options. This will depend on the API service provider requirements.
* **Callback URL:** The client application callback URL redirected to after auth, and that should be registered with the API provider. If not provided, Postman will use a default empty URL and attempt to extract the code or access token from it. If this does not work for your API, you can use the following URL: `https://oauth.pstmn.io/v1/browser-callback`
* **Authorize using browser:** You can enter your credentials in your web browser, instead of the pop-up that appears in Postman by default when you use the **Authorization code** or **Implicit** grant type. Checking this box will set the **Callback URL** to return to Postman. If you opt to authorize using the browser, make sure pop-ups are disabled for the callback URL, otherwise it will not work.
* **Auth URL:** The endpoint for the API provider authorization server, to retrieve the auth code.
* **Access Token URL:** The provider's authentication server, to exchange an authorization code for an access token.
* **Client ID:** The ID for your client application registered with the API provider.
* **Client Secret:** The client secret given to you by the API provider.
* **Scope:** The scope of access you are requesting, which may include multiple space-separated values.
* **State:** An opaque value to prevent cross-site request forgery.
* **Client Authentication:** A dropdown—send a Basic Auth request in the header, or client credentials in the request body. *After upgrading to a new version, change the value in this dropdown menu to avoid problems with client authentication.*
**Advanced Options tab**
* **Resource:** A URI that indicates the resource or target service where the token is intended to be used.
* **Audience:** A URI that indicates the target audience or service where the token is intended to be used.
When your config is complete, click **Get New Access Token**.
> When you use **Authorization code** or **Implicit** grant type, you will be prompted to supply your credentials to retrieve an access token to use in subsequent requests. By default Postman will display a pop-up browser when you click **Request Token**. You can alternatively choose to authenticate using your system's default web browser. Select **Authorize using browser** and the **Callback URL** will autofill to return to Postman when you have completed auth in the browser, so that your requests can use the token returned on successful authentication.
If you successfully receive a token from the API, you will see its details, together with the expiry, and optionally a refresh token you can use to retrieve a new access token when your current one expires. Click **Use Token** to select the returned value.
Any successfully retrieved tokens will be listed in the request **Available Tokens** dropdown list. Select one to send with your request. Select **Manage Tokens** in the dropdown list to view more details or delete your tokens.
If authentication fails or times out, Postman will display an error message. You can check the error details in the console, **Retry** to attempt authentication again, or edit your auth details before continuing.
> Deleting a token in Postman does not revoke access. Only the server that issues the token can revoke it.
### Hawk authentication
Hawk authentication enables you to authorize requests using partial cryptographic verification.
In the **Authorization** tab for a request, select **Hawk Authentication** from the **Type** dropdown list.

Enter your details in the **Hawk Auth ID**, **Hawk Auth Key**, and **Algorithm** fields. You can optionally set advanced details, but Postman will attempt to generate values for them if necessary.
> When the required details are complete in the **Authorization** tab for your request, Postman will add them to the **Headers**.
The Hawk Authentication parameters are as follows:
* **Hawk Auth ID:** Your API authentication ID value.
* **Hawk Auth Key:** Your API authentication key value.
* **Algorithm:** The hash algorithm used to create the message authentication code (MAC).
* Advanced parameters:
* **User:** The username.
* **Nonce:** A random string generated by the client.
* **ext:** Any application-specific information to be sent with the request.
* **app:** The binding between credentials and the application to prevent an attacker using credentials issued to someone else.
* **dlg:** The ID of the application the credentials were issued to.
* **Timestamp:** Timestamp the server uses to prevent replay attacks outside the time window.
### AWS Signature
AWS is the authorization workflow for Amazon Web Services requests. AWS uses a custom HTTP scheme based on a keyed-HMAC (Hash Message Authentication Code) for authentication.
The official AWS Signature documentation provides more detail:
* [Signing and Authenticating REST Requests](https://docs.aws.amazon.com/AmazonS3/latest/userguide/RESTAuthentication.html)
* [Use Postman to Call an API](https://docs.aws.amazon.com/apigateway/latest/developerguide/how-to-call-api.html)
In the **Authorization** tab for a request, select **AWS Signature** from the **Type** dropdown list.

Select where Postman should append your AWS auth details using the **Add authorization data to** drop-down—choosing the request headers or URL.
* If you select **Request Headers**, Postman will add `Authorization` and `X-Amz-` prefixed fields in the **Headers** tab.
* If you select **Request URL**, Postman will add the auth details in **Params** with keys prefixed `X-Amz-`.
Enter your access key and secret values either directly in the fields or via variables for additional security.
You can optionally set advanced fields, but Postman will attempt to auto-generate these if necessary.
The AWS Signature parameters are as follows:
* **AWS Region:** The region receiving the request (defaults to `us-east-1`).
* **Service Name:** The service receiving the request.
* **Session Token:** Required only when using temporary security credentials.
### NTLM authentication
Windows Challenge/Response (NTLM) is the authorization flow for the Windows operating system and for standalone systems.
In the **Authorization** tab for a request, select **NTLM Authentication** from the **Type** dropdown list.

Enter your **Username** and **Password** for NTLM access (use variables to avoid entering the values directly). You can optionally specify advanced parameters, but Postman will attempt to autocomplete these if necessary. By default your request will run a second time after extracting data received from the first—you can disable this by checking the checkbox.
Advanced parameters for NTLM auth are as follows:
* **Domain:** The domain or host to authenticate against.
* **Workstation:** The hostname of the PC.
### Akamai EdgeGrid
Akamai Edgegrid is an authorization helper developed and used by Akamai.
In the **Authorization** tab for a request, select **Akamai EdgeGrid** from the **Type** dropdown list.

Enter your **Access Token**, **Client Token**, and **Client Secret**, using variables for additional security—you will receive these details when you register a client application with Akamai.
> When the required details are complete in the **Authorization** tab for your request, Postman will add them to the **Headers**.
For information on obtaining your credentials, see [Akamai Developer - Authorize your Client](https://developer.akamai.com/legacy/introduction/Prov_Creds.html).
### Syncing cookies
If you have session cookies in your browser, you can sync them to Postman using the Interceptor—see [Interceptor extension](https://learning.postman.com/docs/sending-requests/capturing-request-data/interceptor/) and [Cookies](https://learning.postman.com/docs/sending-requests/cookies/) for more detail.
### Next steps
If you're having issues getting a request to authenticate and run successfully, try some of the tips in [troubleshooting API requests](https://learning.postman.com/docs/sending-requests/troubleshooting-api-requests/). If you still have auth problems, check out the [authentication tag](https://community.postman.com/tags/authentication) on the Postman forum.